
Stylized Cottage Final Deliverable Image
Introduction
Hello! My name is Madeline Husby, and I wanted my Senior Undergraduate Capstone project at Texas A&M to revolve around creating a stylized asset that undergoes the video game production pipeline and is presented in the end using Unreal Engine 5. The point of this project was to teach me the elements and steps that an environment asset must go through to be most efficient and usable within a video game production workflow. In my past projects, I have familiarized myself with the production pipeline of animation projects and assets, so I wanted to become a more well-rounded 3D artist by exploring the other side of the 3D world.
The stylized workflow specifically appealed most to me because it was extremely unlike anything I had done before or had within my portfolio, and also because stylized games are the ones I most enjoy as a consumer, so I thought it would be fun and enlightening to explore exactly what goes on behind the scenes of a stylized game workflow. Before this project, I would describe my skills and knowledge of the modeling and texturing workflow for games to be not that strong, especially when it game to the stylized specific workflow.
My mentors for this project included Nathan Ayres, an experienced 3D Game Environment Artist in the industry, as well as Caleb Kicklighter, a professor at Texas A&M with experience in 3D sculpting, modeling, and texturing.
The Stylized Cottage Project
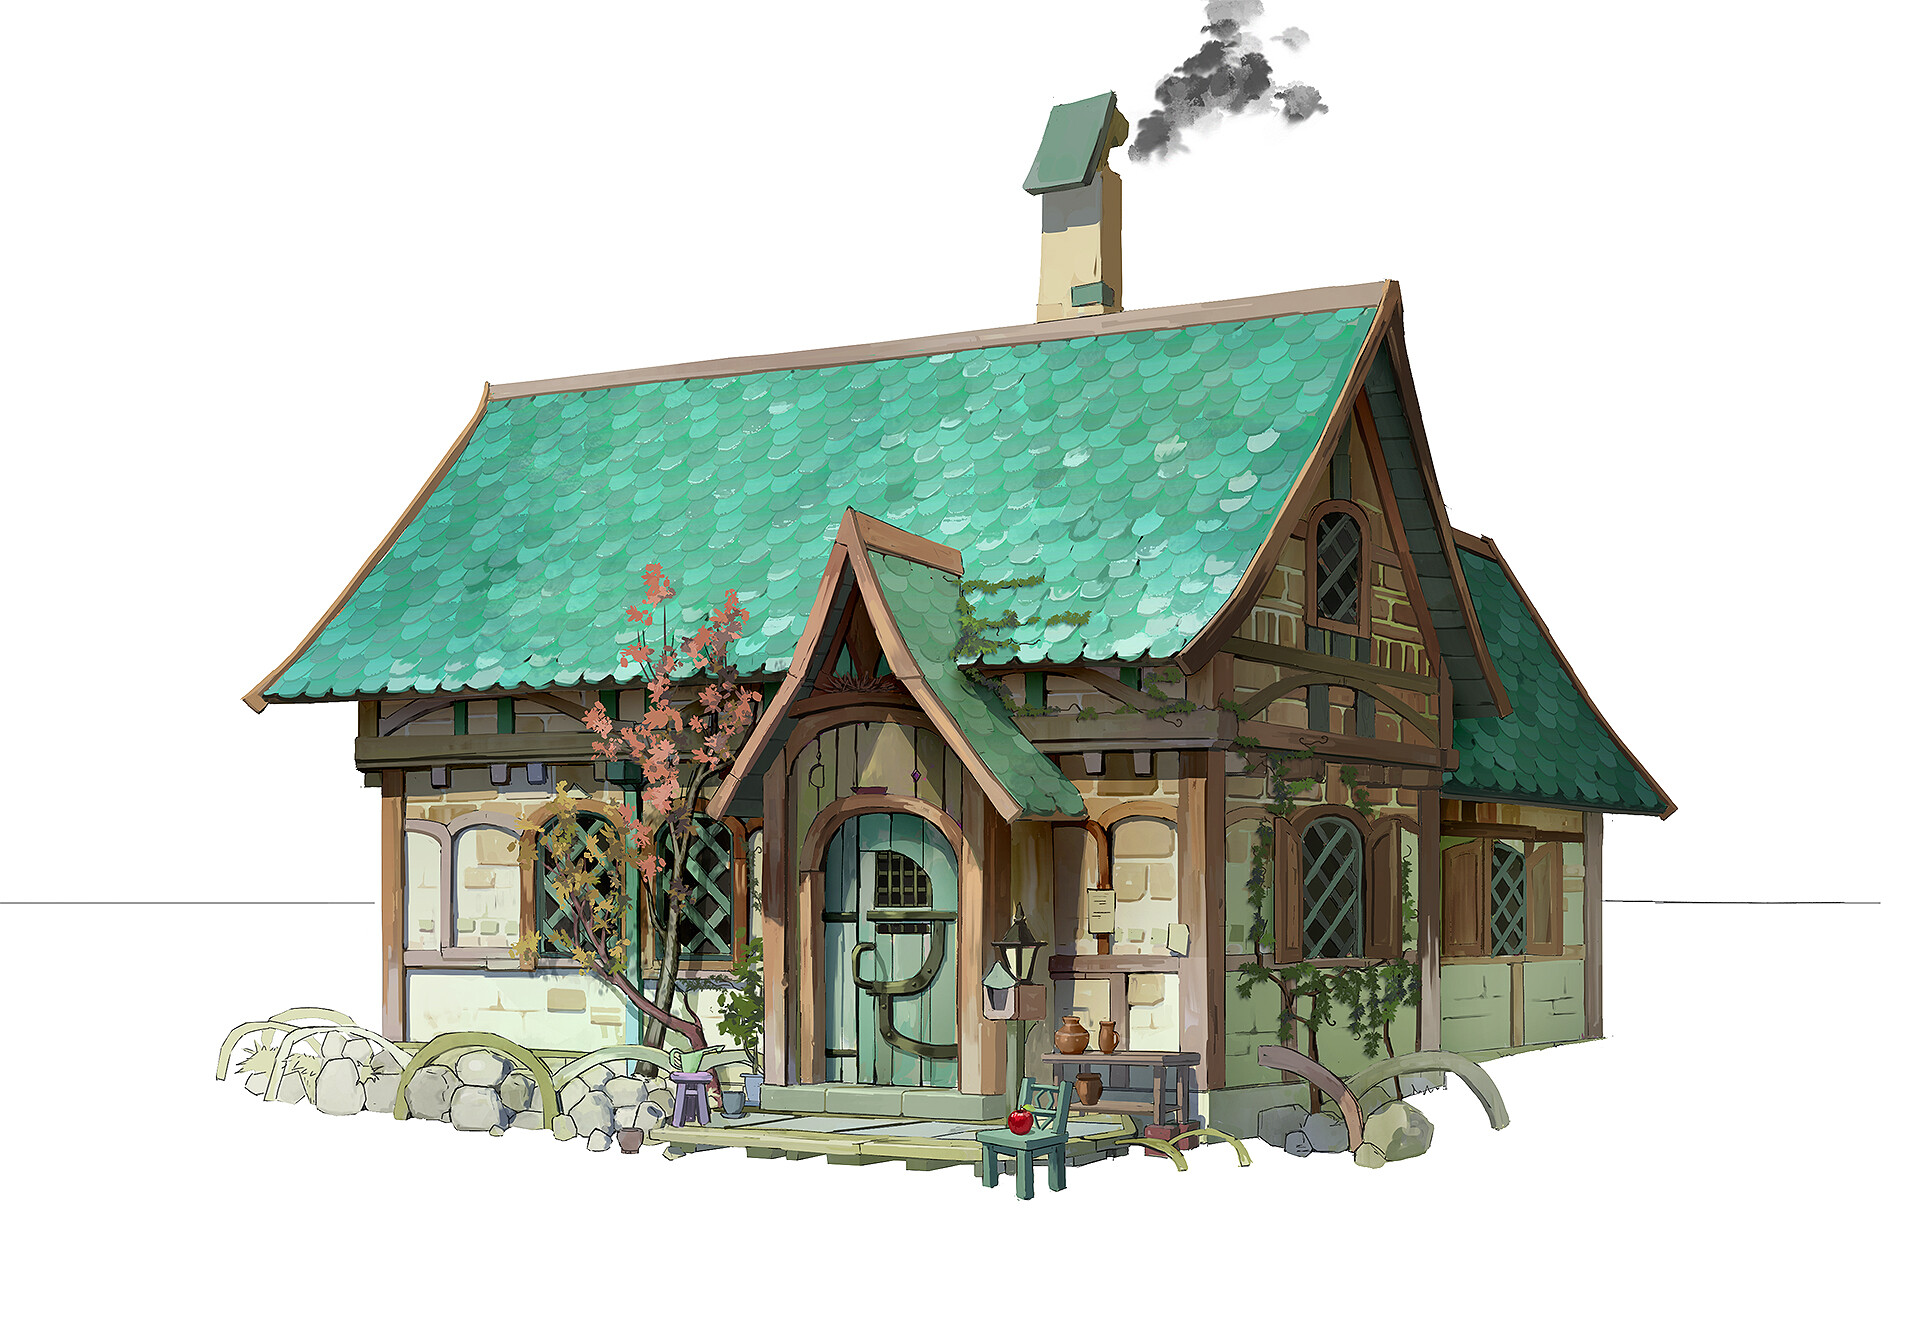
"Beautiful House" concept art by Jeon Hyun Ho
My goal with choosing a concept art was to find a piece that seemed reasonable in project scope, while also demonstrating a good representation of materiality and form within the art itself so that I had less guesswork on my end when creating textures and modeling. The piece I ended up choosing was "Beautiful House" by Jeon Hyun Ho on ArtStation.
Once I settled on a concept art piece, I decided to analyze and block out the main forms and assets that I would be creating before I began modeling. This helped my workflow a lot by allowing me to create a plan and a reasonable approach to tackling a project like this. I also drew out a rough sketch in Procreate around the art to visualize what I thought the final product might end up looking like.
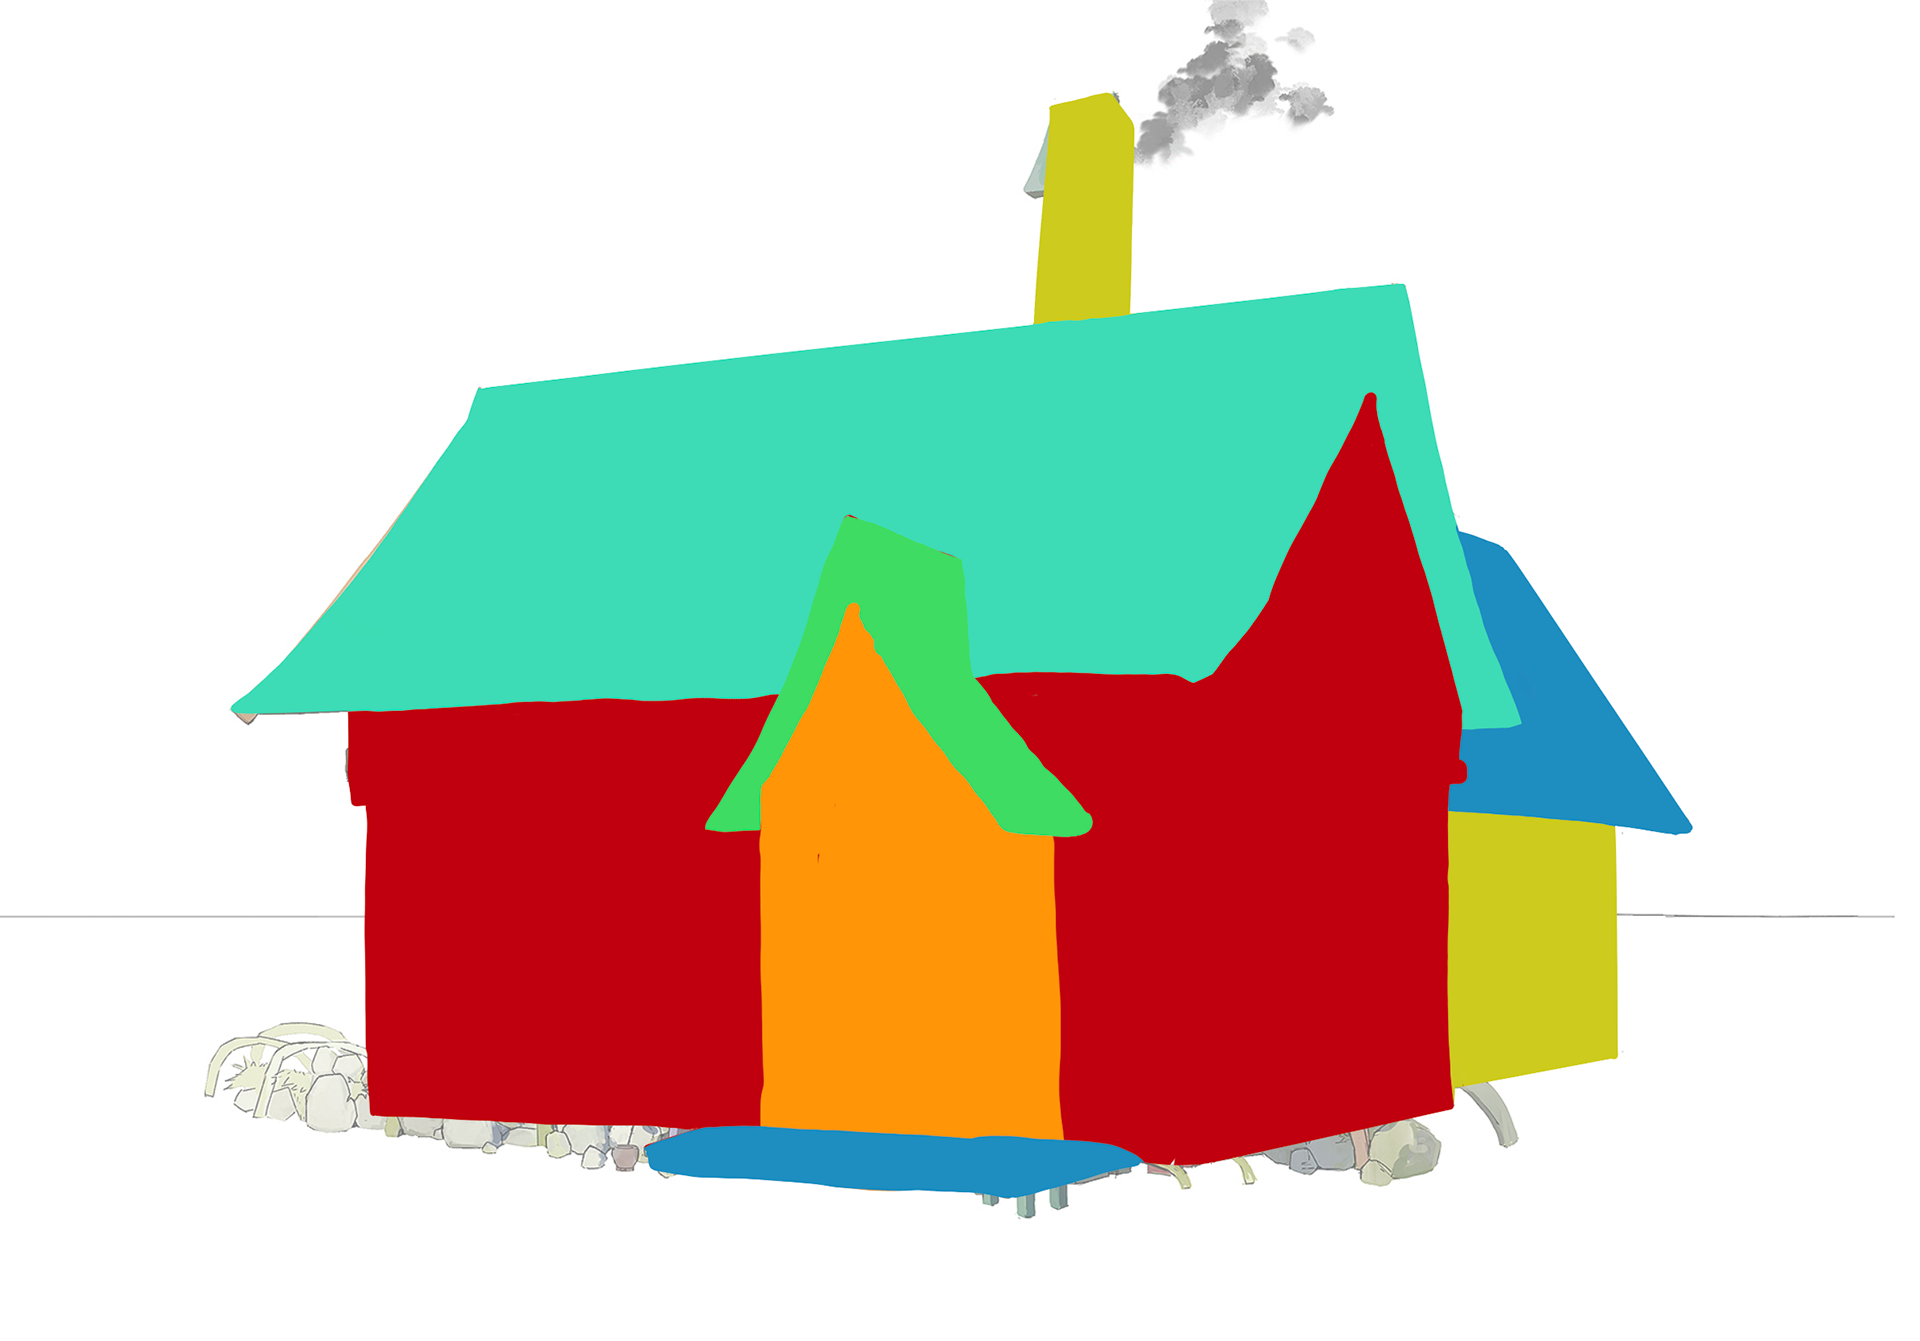
Large shape color blockout
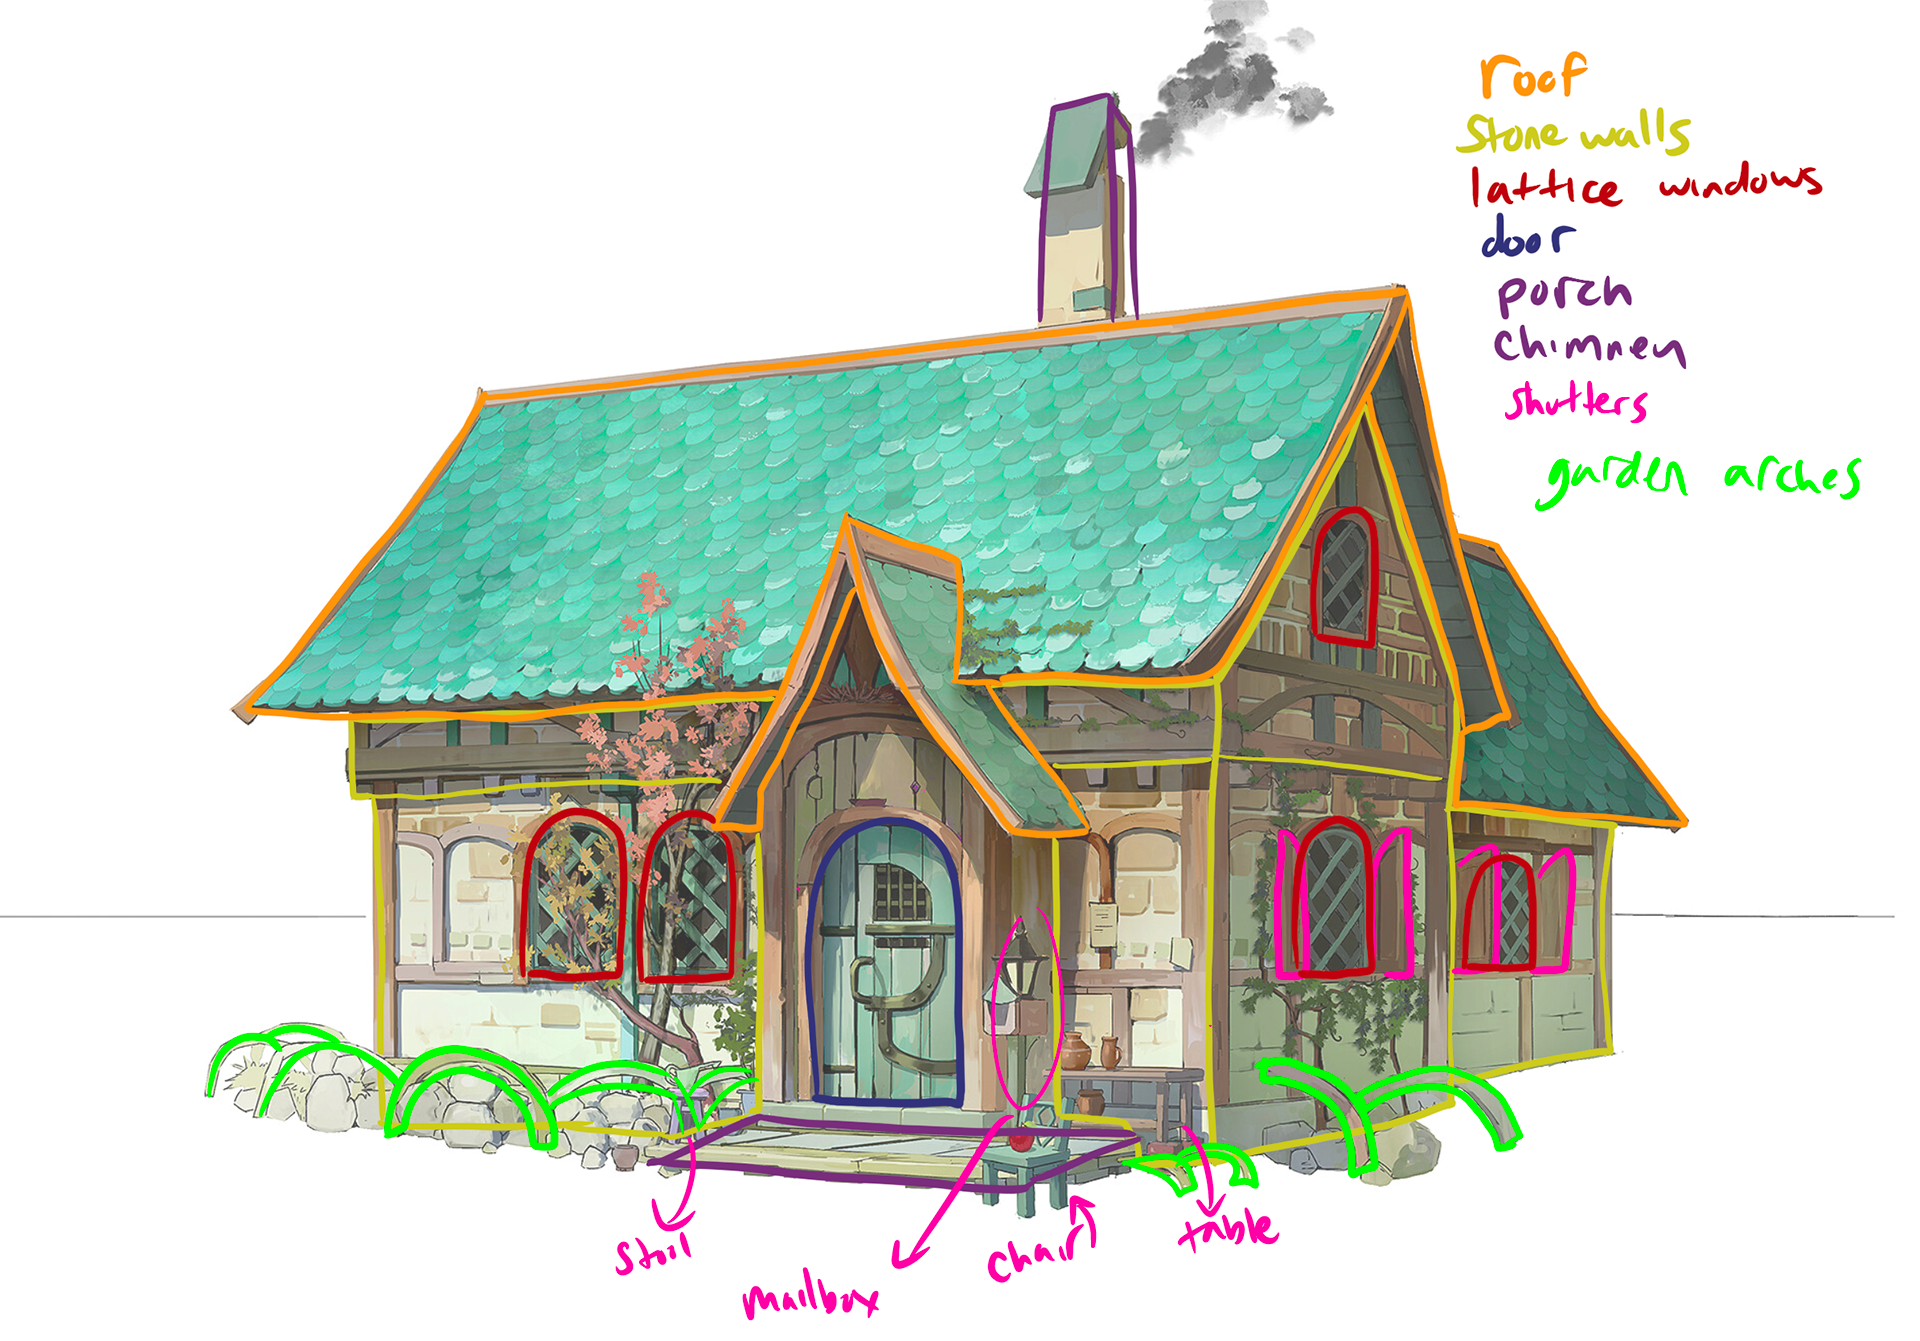
Material and asset analysis of the art
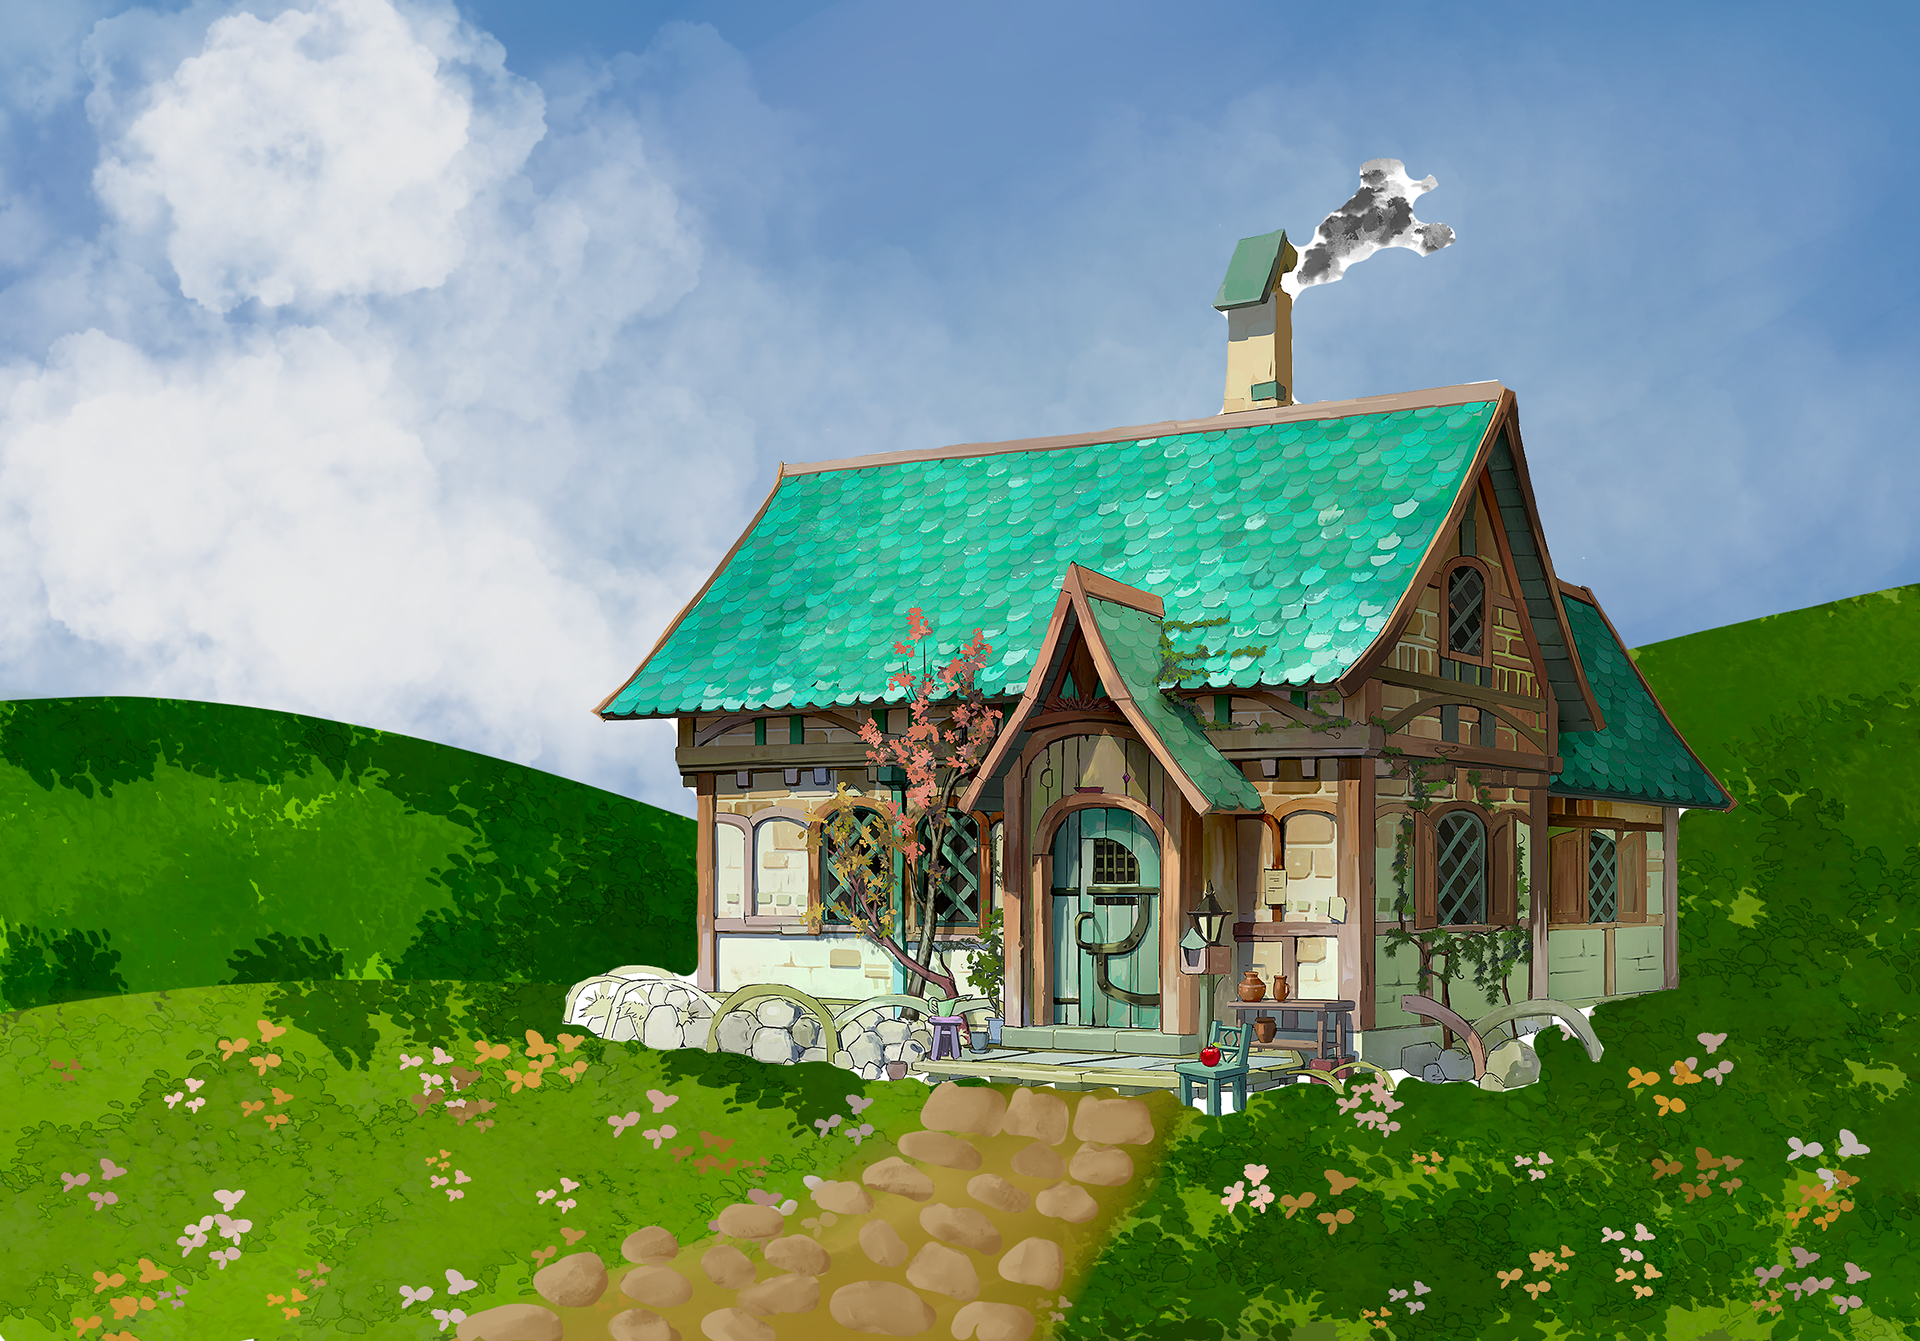
Rough sketch of possible final product
Project References & Style Inspiration
Another thing I did before beginning the project was gather references of projects and games that inspired me with how they were modeled and textured so that I could use those references as a guide throughout the course of the project.
Past projects that inspired me as a 3D artist in both the final visual of the deliverable and the techniques used were the Sunny Market Entrance by Jasmin Habezai-Fekri, Woodcutter's Hut by Mersad Fazeli, Violet House by Victoria Zavhorodnia, and the Unreal Marketplace scene Provencal Environment by Stéphane Charré. For all these projects, the artists went into depth about the steps they took and methods they used, especially when it came to texturing and achieving a stylized style, which I found very helpful.
I also thought it was important to find a game with a style that I wanted to emulate with this project, since my goal for the project since the beginning was to study and follow the game asset pipeline. The game I ended up settling on as my style guide for the project was Genshin Impact by Hoyoverse, and so I gathered lots of screenshots of how their buildings were constructed and designed in the game.
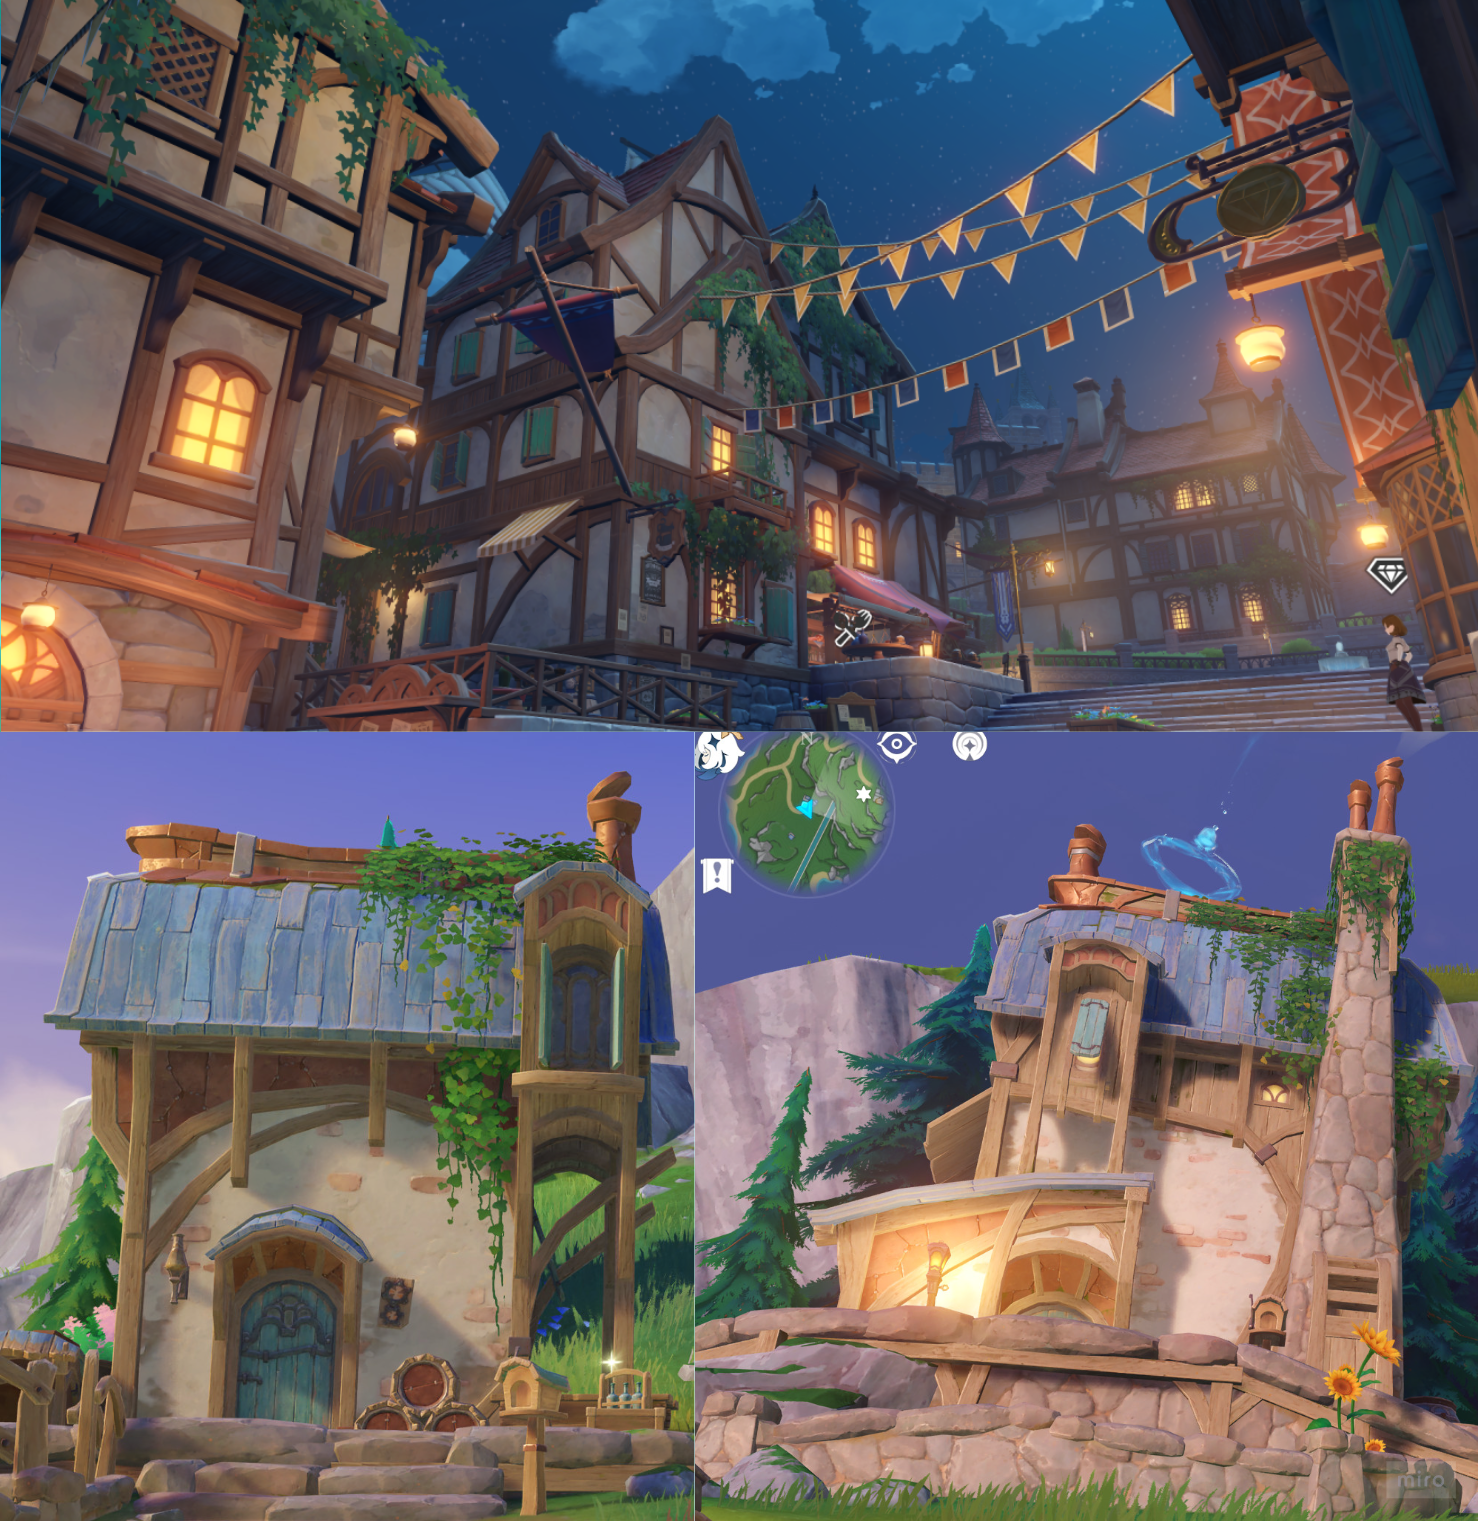
Screenshots from the game Genshin Impact
Modeling
Modeling for this project was a fun challenge for me, especially when it came to trying to match up the proportions of my 3D model to the concept art. One of the tools I was recommended to use was the fSpy camera plugin for Maya, which allowed me to upload the concept art into the tool, and generate a camera that matched the perspective of the art.
While modeling, I learned about the importance of optimizing model geometry for Game Production and using as few edge loops as possible in strategic places to decrease game package size and optimize performance. Although I knew this before when it came to the 3D Animation pipeline, the importance of optimization was much more prevalent for games.
Another thing I kept in mind while modeling was symmetry, and creating modular assets that could be easily duplicated and used in other spots around the house. This was especially useful when it came to creating the wood trim pieces that are utilized multiple times around the house. The wood planks, arches, and large trim and support pieces are all using the same base model, however, at certain points I simply scaled, stretched, or squashed the mesh depending on what silhouette or look I was trying to achieve. This workflow made it much easier to texture the model later down the line, as I planned on using a trim sheet workflow for the wood and wanted one trim sheet to be easily transferrable to multiple models.
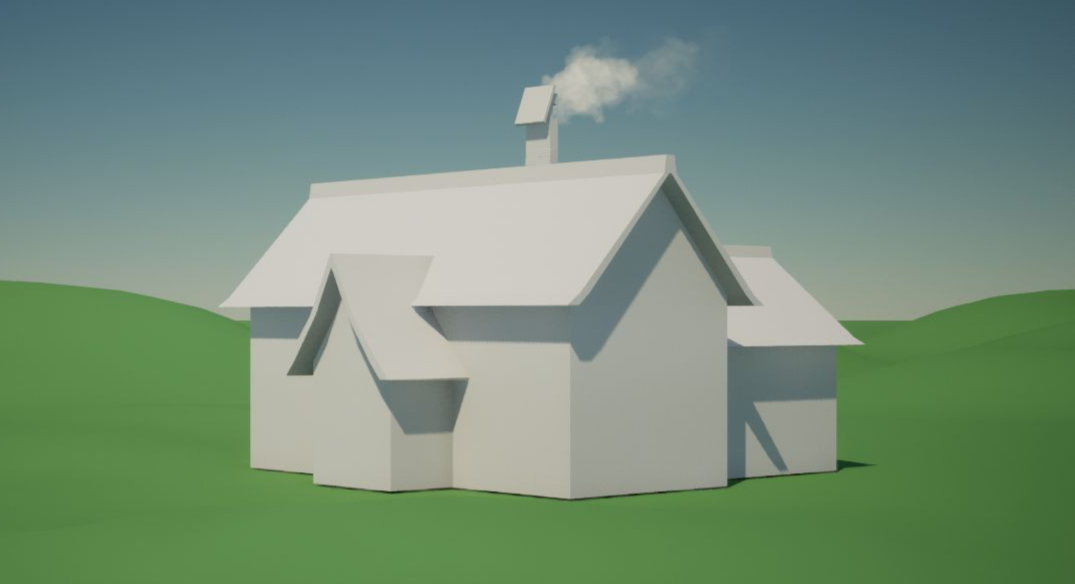
Large Shape Blockout in Unreal
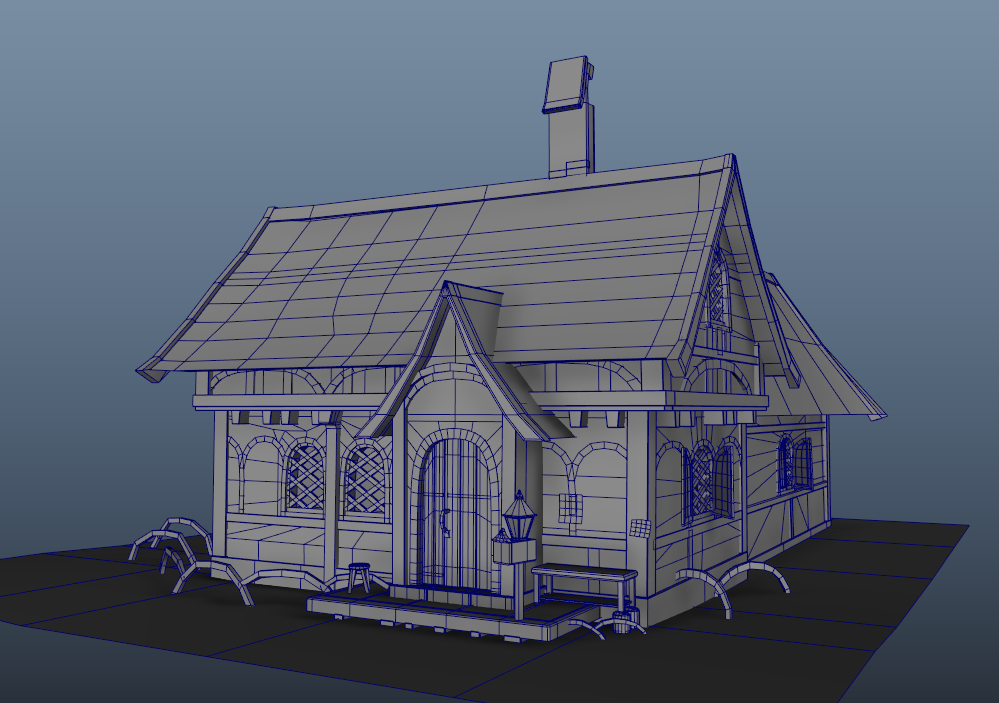
Before Optimizing Geometry and Edge Loops
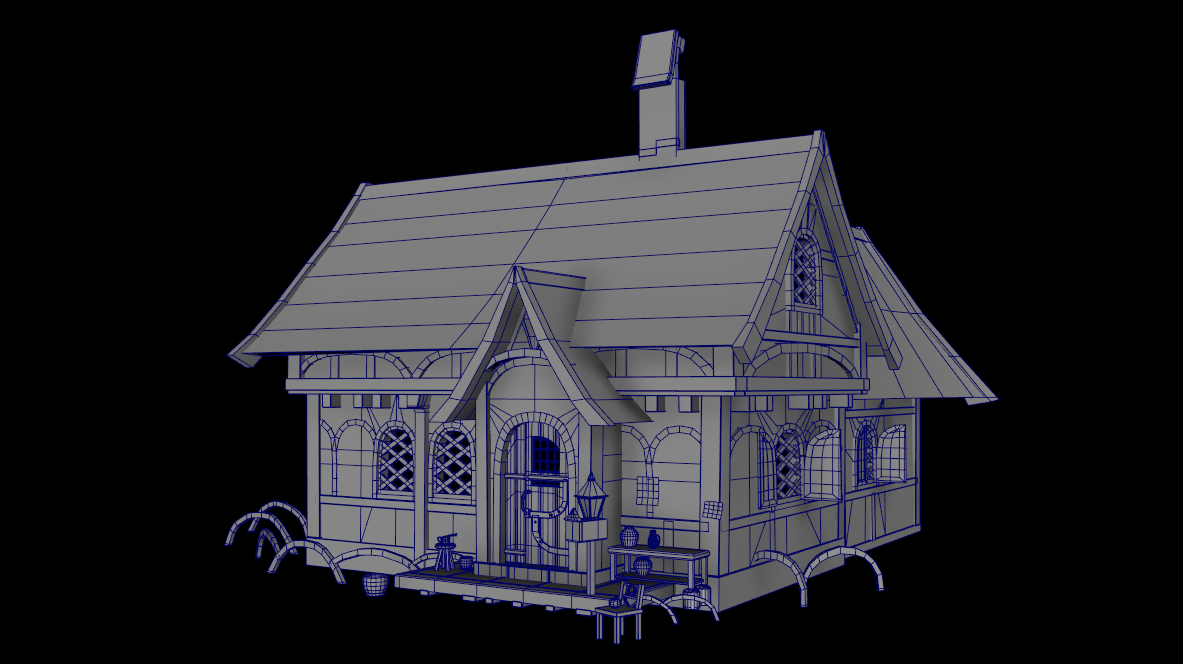
After Optimization and Fixing Topology

Some Modular Assets Used
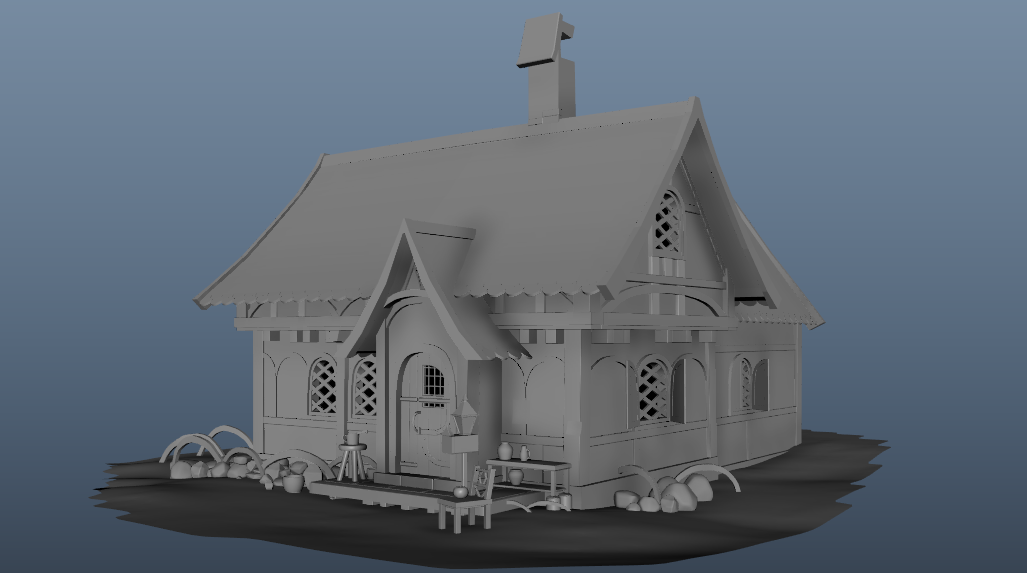
Final Model
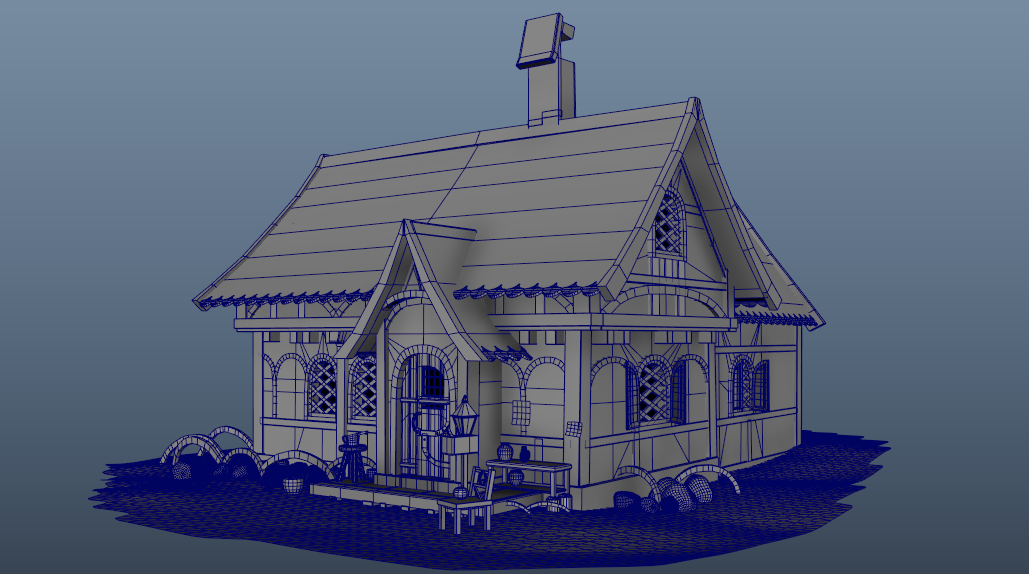
Final Model Wireframe
When it was time for the sculpting portion of my project, I was a bit nervous but also excited, as I have less experience with ZBrush and the high-to-low poly workflow. I knew that the main items that I would have to sculpt would be the wood planks for my wood trim sheet, the front door of the house, as well as the rocks that would be placed around the house. After finding some good tutorials that were extremely useful for my process, I set to work.
For the rocks, the main tutorial I utilized was "Easiest Way to Sculpt Rocks in ZBrush" by Stylized Station on YouTube.
My goal for sculpting my rocks was to create 3 distinctly different rocks that all looked different depending on the angle they were viewed. The main shapes I tried to create were a tall pointy rock, a wide flat rock, and a more round generic rock. Once I created high versions of each of these rocks, I used ZRemesher to decrease the poly count down, but keep it high enough so that the main form was still noticeable and able to be baked down on without becoming too soft. Looking back, I probably could have reduced the poly count even more than I did, however, since this was a showcase piece and not for a game it didn't end up mattering too much when it came to slowing down the scene.
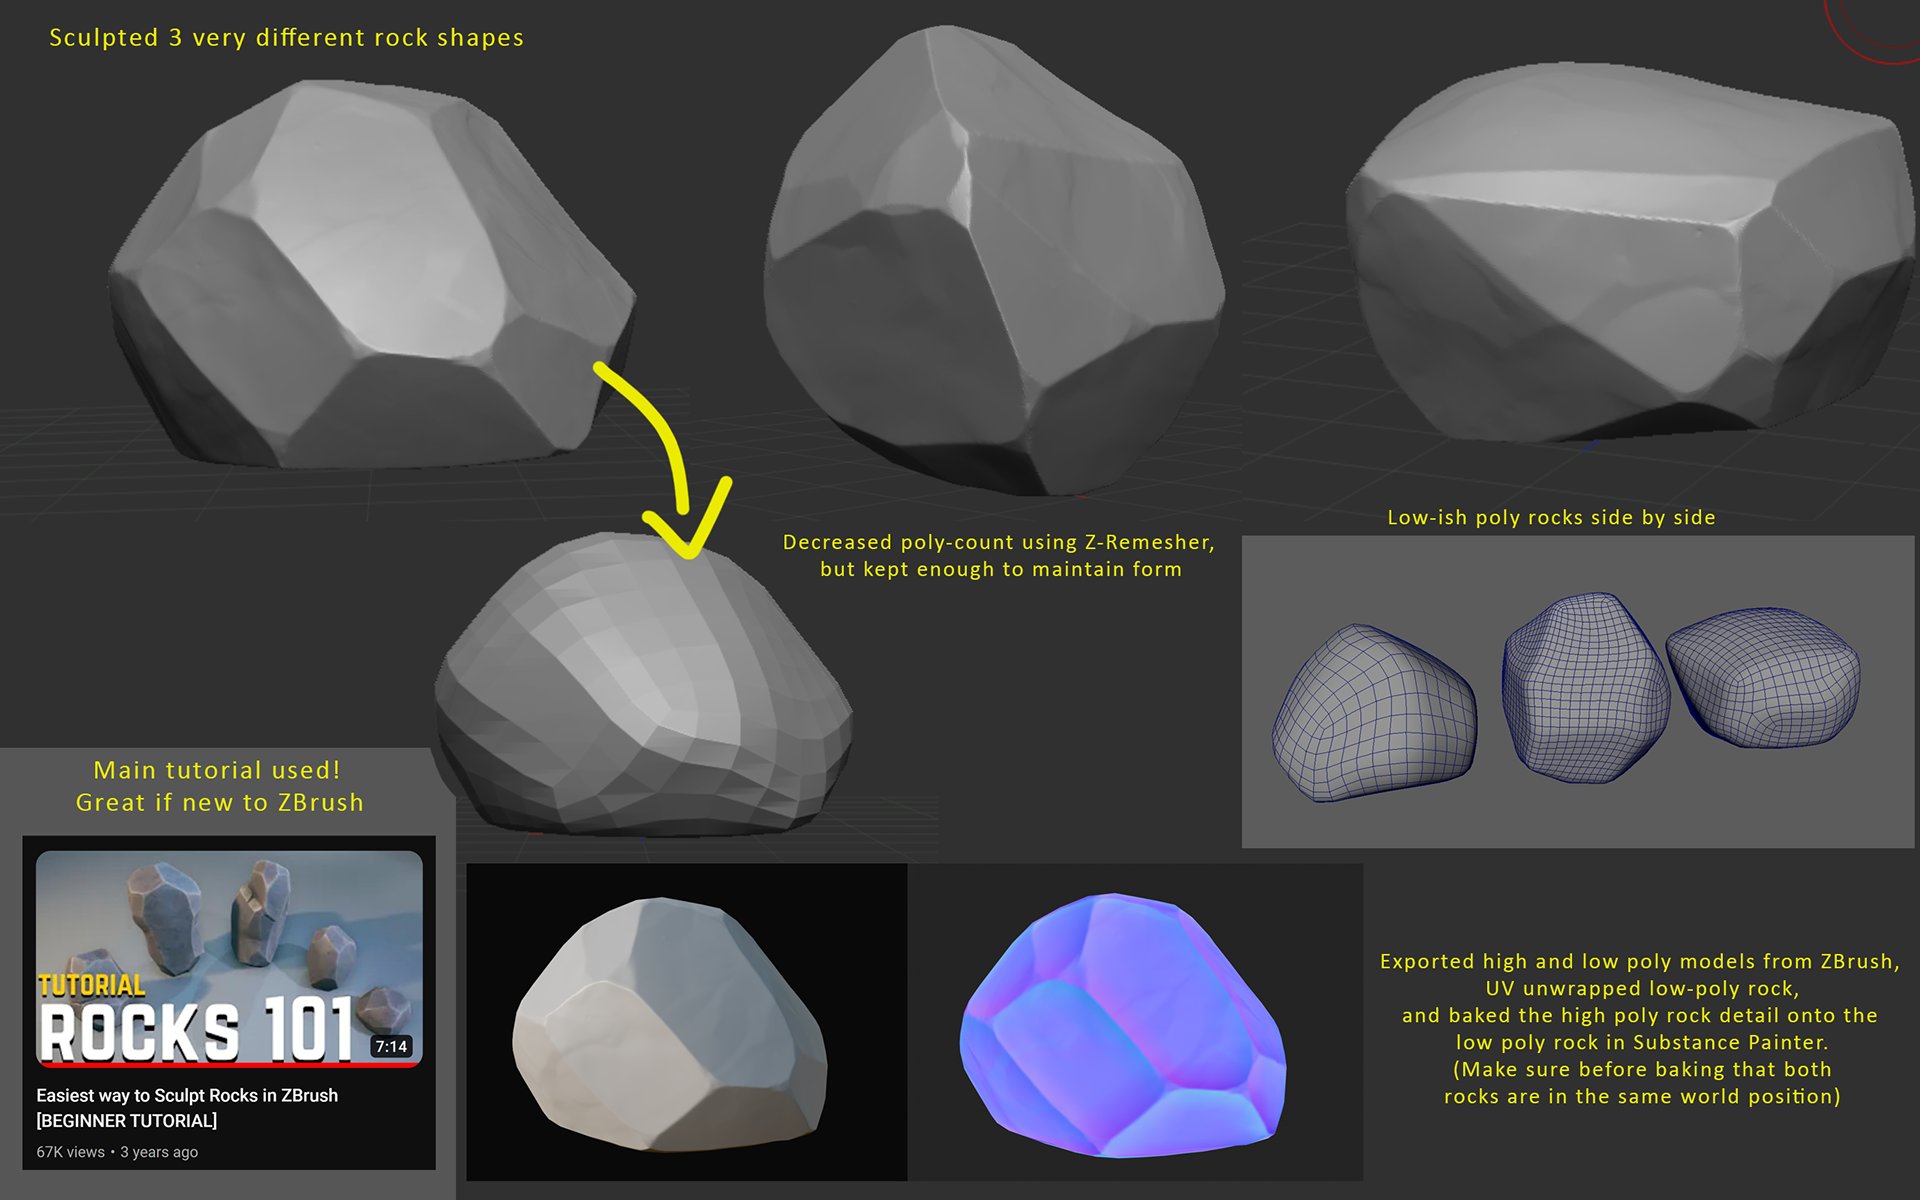
Sculpting Rocks
For my wood trim sheet, the main tutorial that helped me get started was "The Ultimate Trim Sheet Tutorial" by Tugz on YouTube.
The trim sheet I made included 4 wood planks, or sides of a plank, as well as 2 plank endcaps and 2 mini planks. I created the sculpt in ZBrush and then baked the sculpture down onto a flat plane in Substance Painter, where I began texturing it. To achieve a more stylized look for my wood, I used paint drip grunge maps, as well as the blur slope filter on almost everything.
To make the wood tile more seamless, I downloaded the Substance Painter "Make it Tile" filter created by Rob Tomlinson. This filter did end up making a lot of my shapes more blurry, so after using the filter I then clamped down the result with levels nodes.
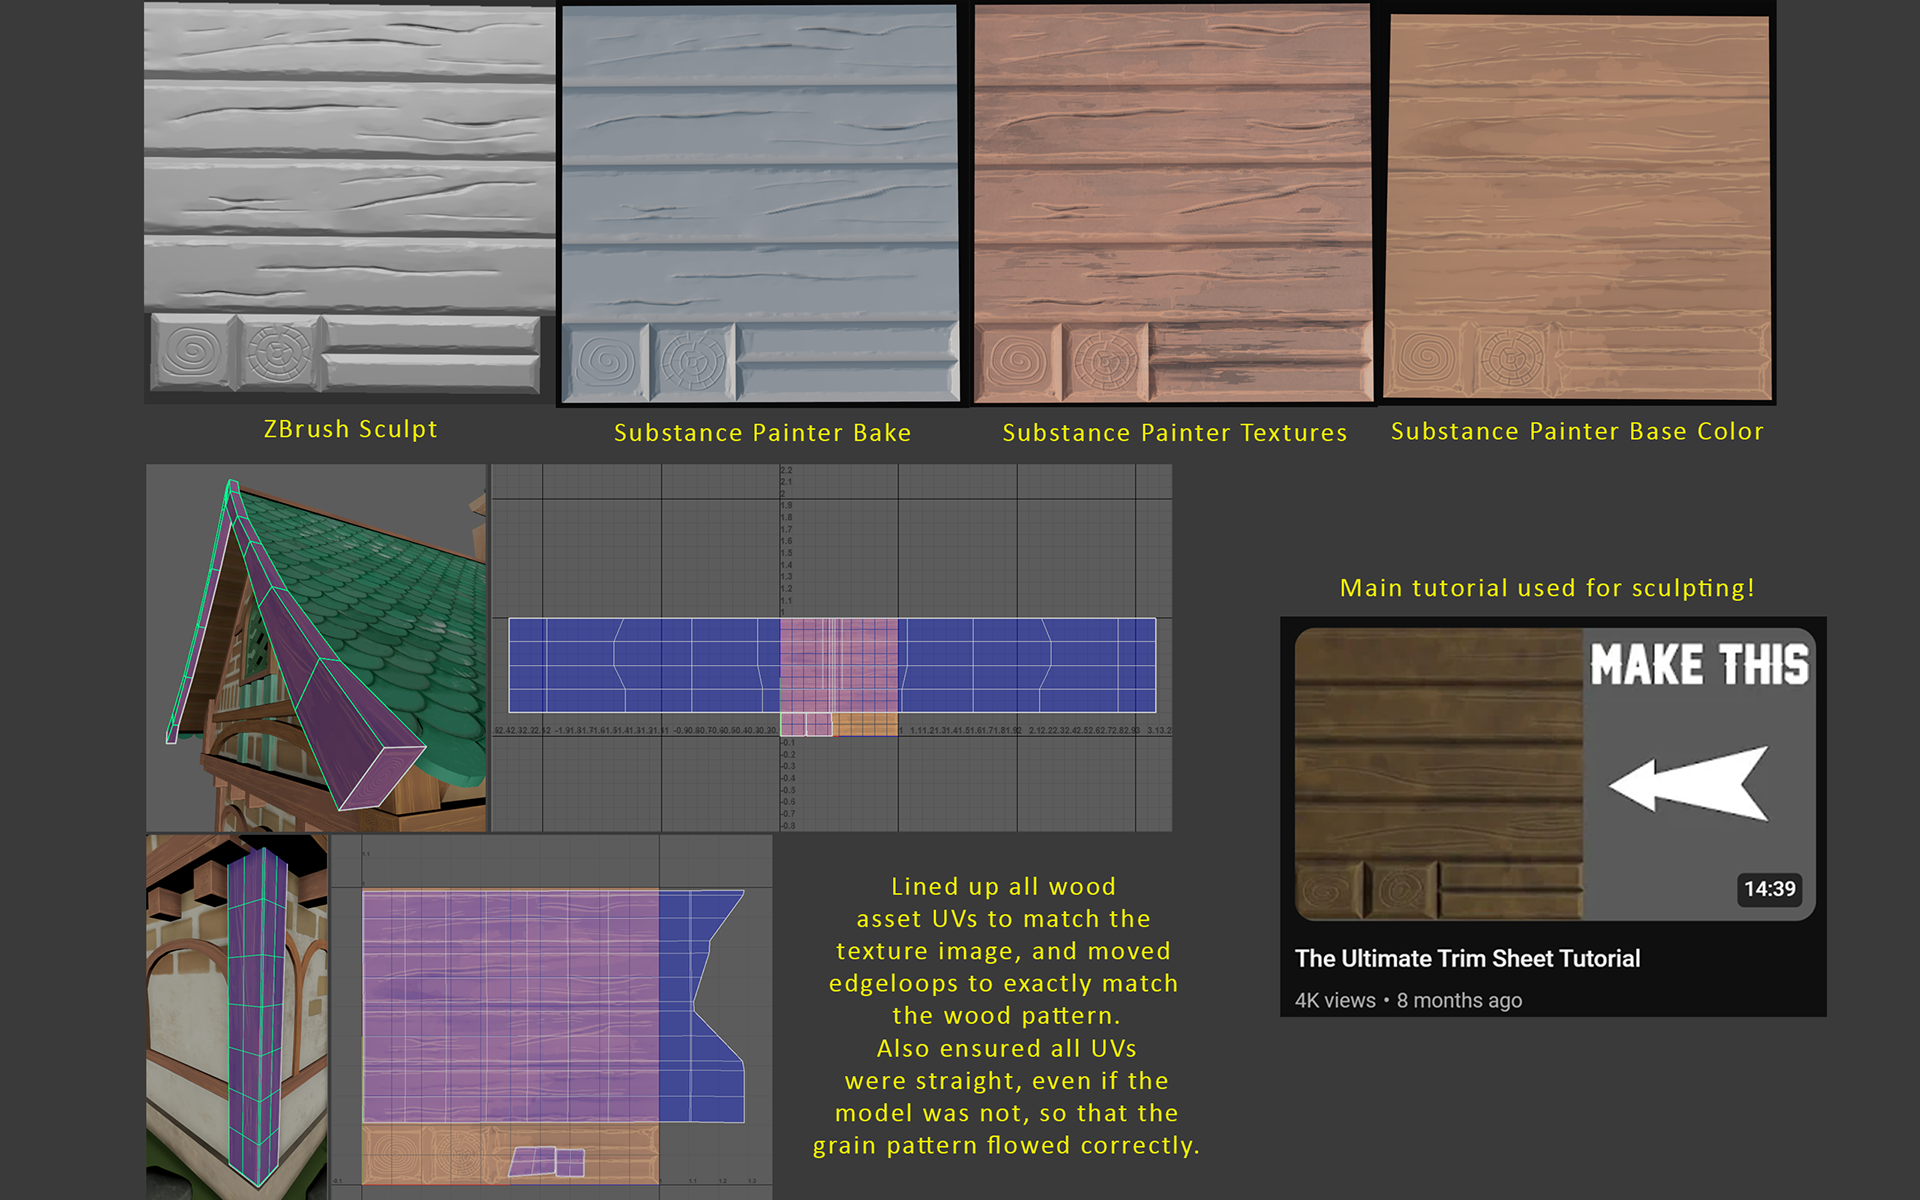
Creating a Stylized Wood Trim Sheet
Once I had a working wood trim sheet that tiled decently well across the planks in my scene, I tried to use the same wood sculpting techniques for the doorway of the house.
Unfortunately, once baking the sculpt down in Substance Painter, I realized that my sculpt lines for the door were slightly too thin and shallow. Due to time constraints, I solved this problem by increasing the normals within the Unreal Scene itself, so that the grain lines were visible from the final camera view. In the future, I plan to go back and refine this sculpt so that crunching the normals isn't necessary.
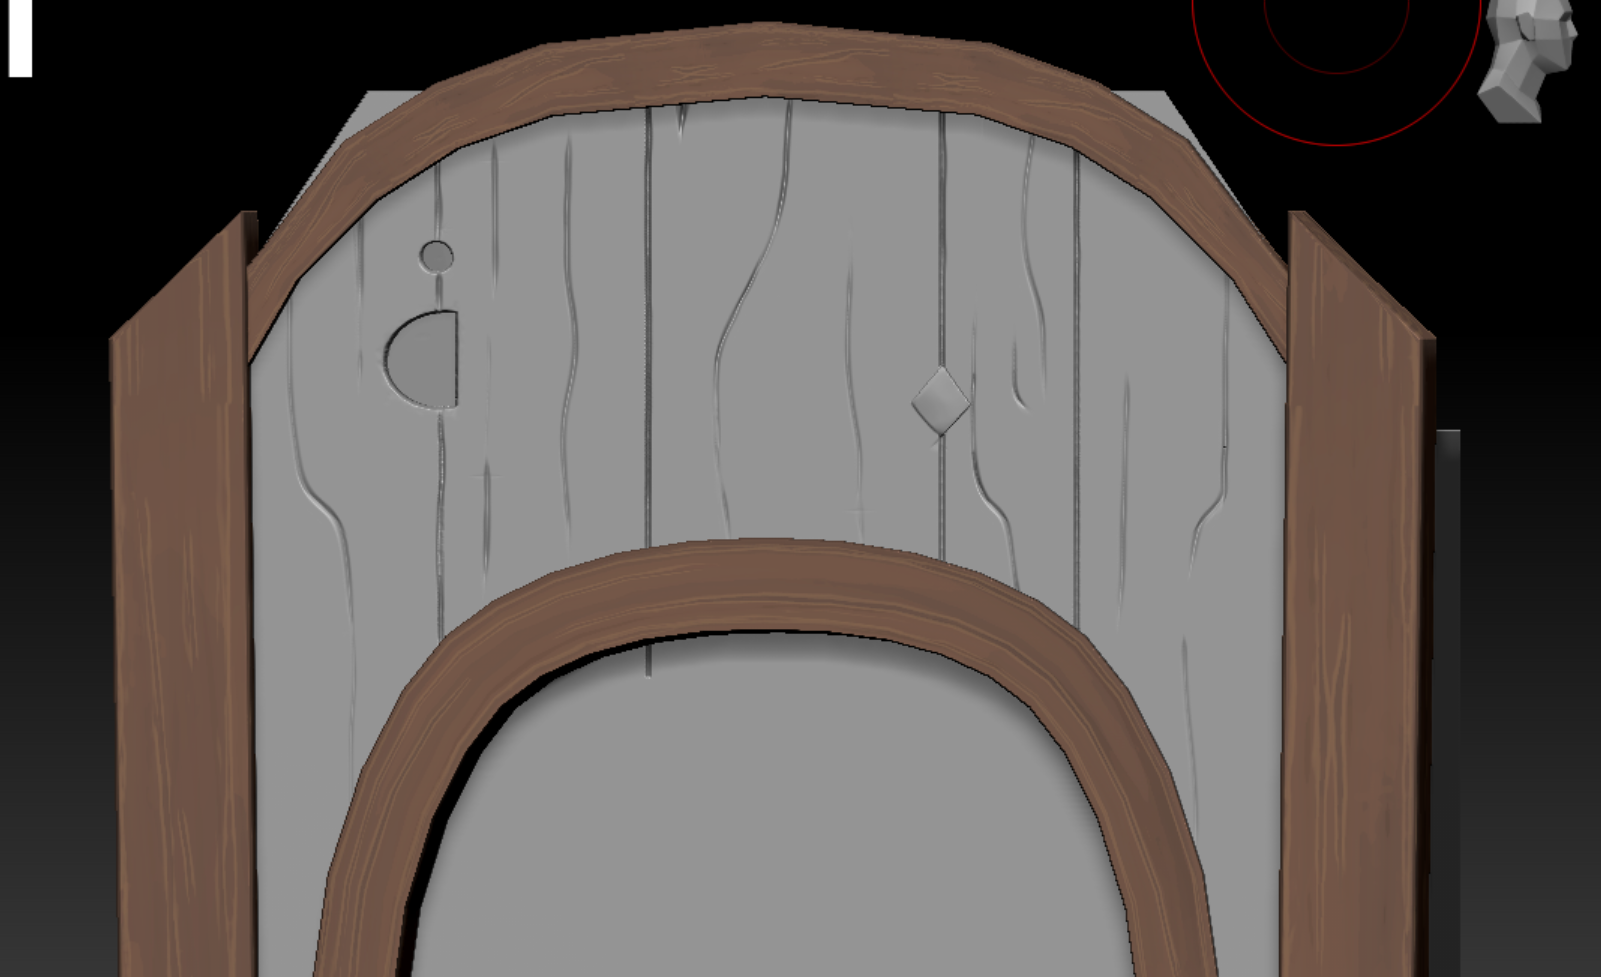
Doorway Arch Sculpt
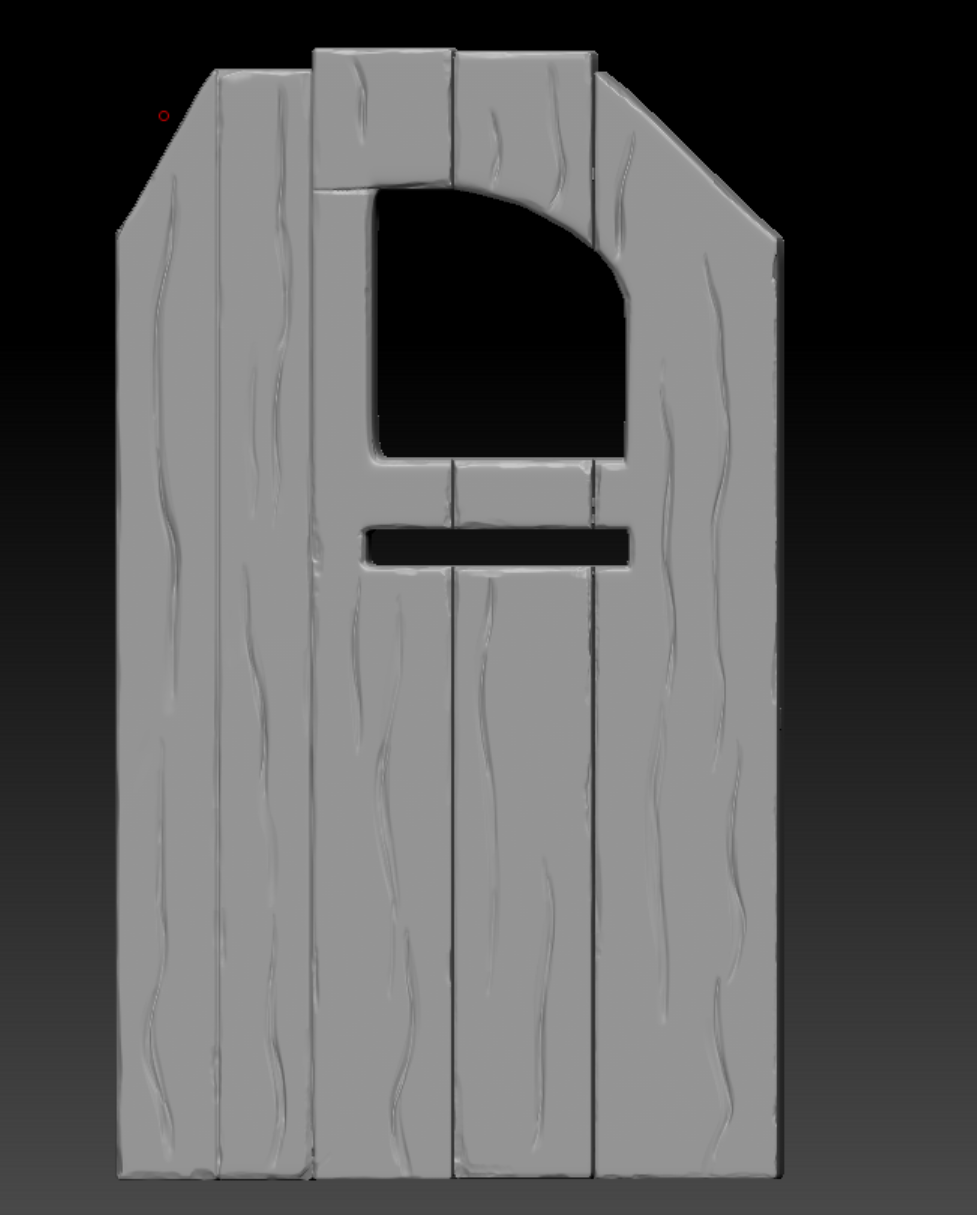
Door Plank Sculpt
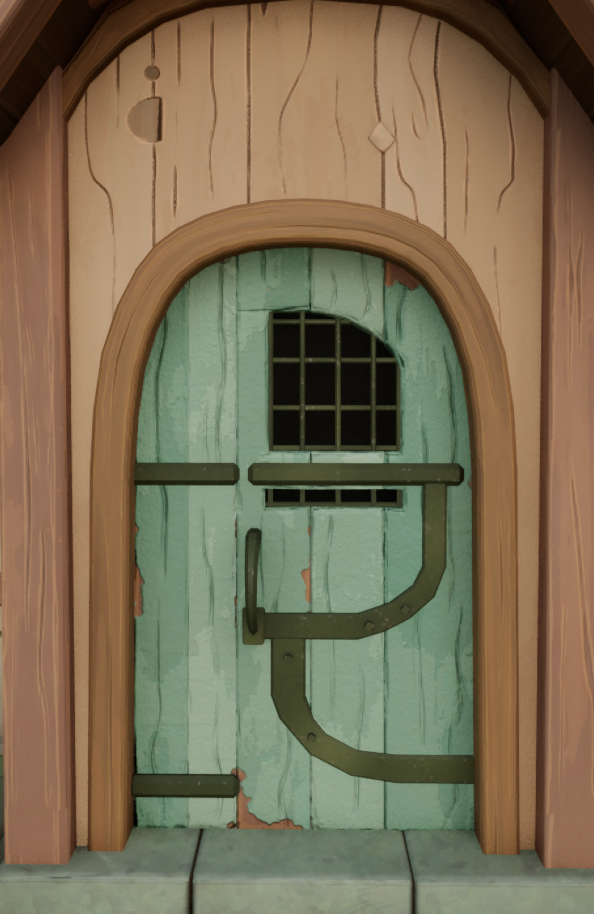
Multiplied Normals in Scene
Foliage
A big part of this project that I knew I would have to learn was foliage, as the original concept art for this piece included grass, bushes, vines, and trees. I had never created foliage before but was excited to learn especially stylized foliage. The main tutorial that helped me get started was the Stylized Leaves tutorial by Romain Durand, as it described how to get started with the card method for stylized foliage. I followed this tutorial for my bush and was able to grasp the foundational knowledge behind this technique.
I started modeling and UV-unwrapping my card shape, and then taking this card into Substance and creating a basic stylized leaf shape. I exported both the alpha for transparency, as well as the base color map.
Next, I created a simple bush shape and arranged my cards around it, being sure to cover the gaps as best as I could. I found it helpful to make the underneath shape a bright color, so that as I arranged the cards I would just cover up any instances of the bright color that I saw. Once there were no gaps, I just combined and merged all the cards and deleted the underneath shape.
Then I created another shape to encapsulate the entire bush of cards and transfer the normals from the case shape to the cards. This makes it so that the foliage is visible from all angles inside the game engine.
Finally, I brought the bush into Unreal and set up the foliage shader. To set this up I used the normal Default Lit shading model with the Translucent Blend Mode and changed the Lighting Mode to Surface TranslucencyVolume. I plugged in my Opacity and Base Color maps, as well as added some subtle wind into the shader.
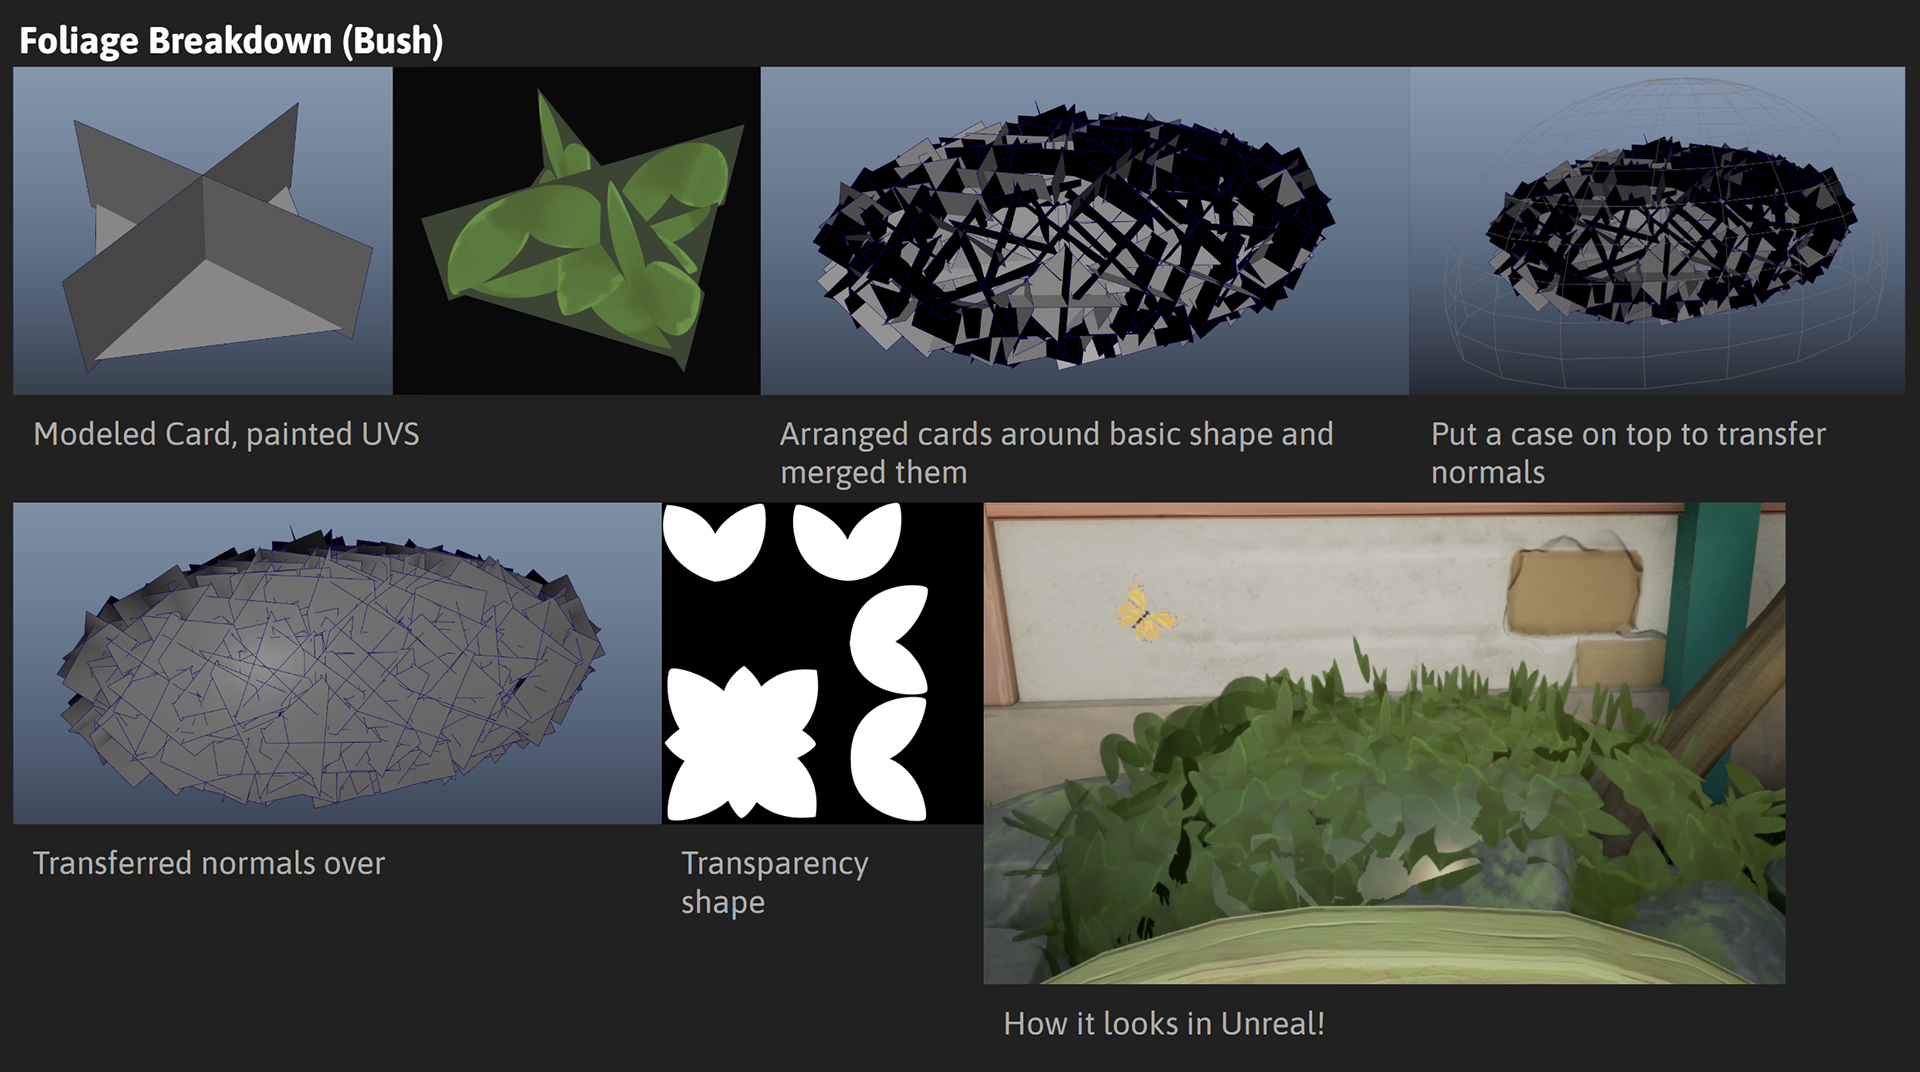
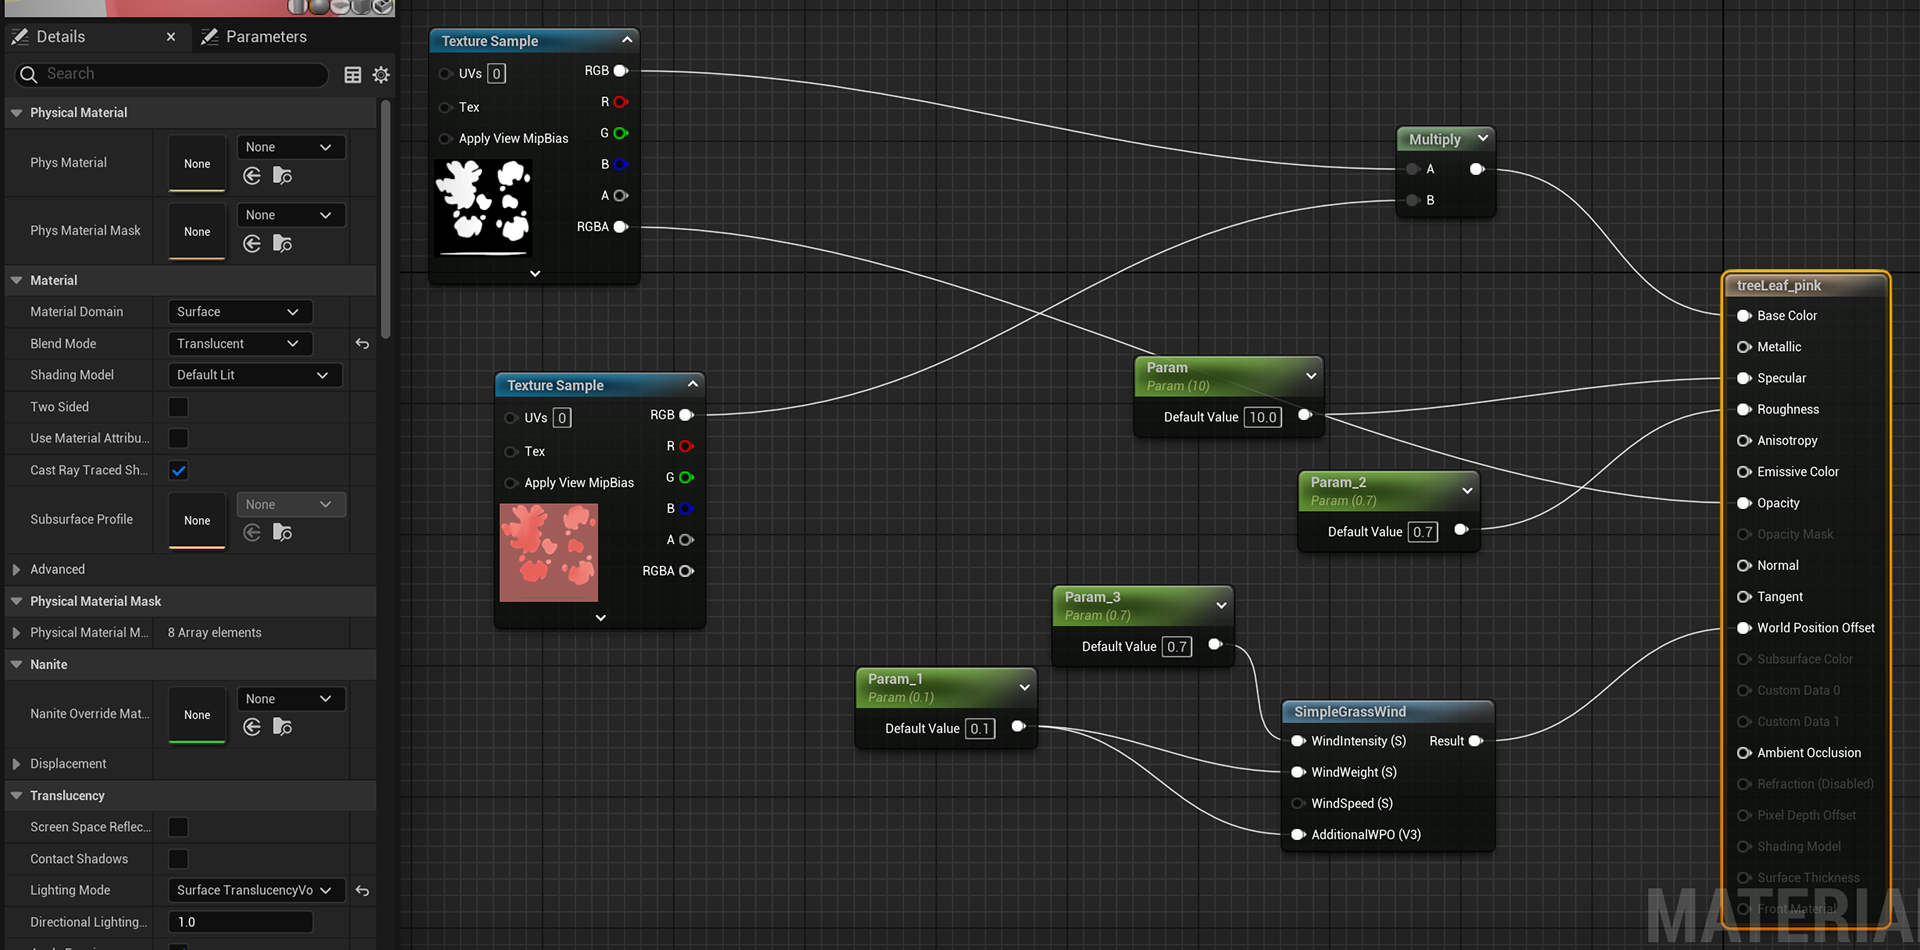
Foliage Creation Using Cards Breakdown
For the trees and vines, I did all the same steps, except I created different card arrangements and texture designs. I also set up my Unreal shaders the same way but adjusted the wind intensity depending on how it looked.

Tree and Vine Foliage Creation
Finally, to create the grass for the scene I mainly utilized the Stylized Grass tutorial by Victoria Zavhorodnia. I did end up getting some strange shadow artifacts for the grass, so to solve this issue I turned off Nanite on the grass, which seemed to fix the issue. I also created two variations of the grass foliage that I painted in the scene, one with significantly higher blades of grass, so that I had further variation/overgrowth in certain parts of the yard.
For the shader of the grass, how it was done in the tutorial was not quite working for my scene, so I ended up setting up my grass shader with a custom base color gradient I made in Photoshop, as well as arranging the nodes like the screenshot below.
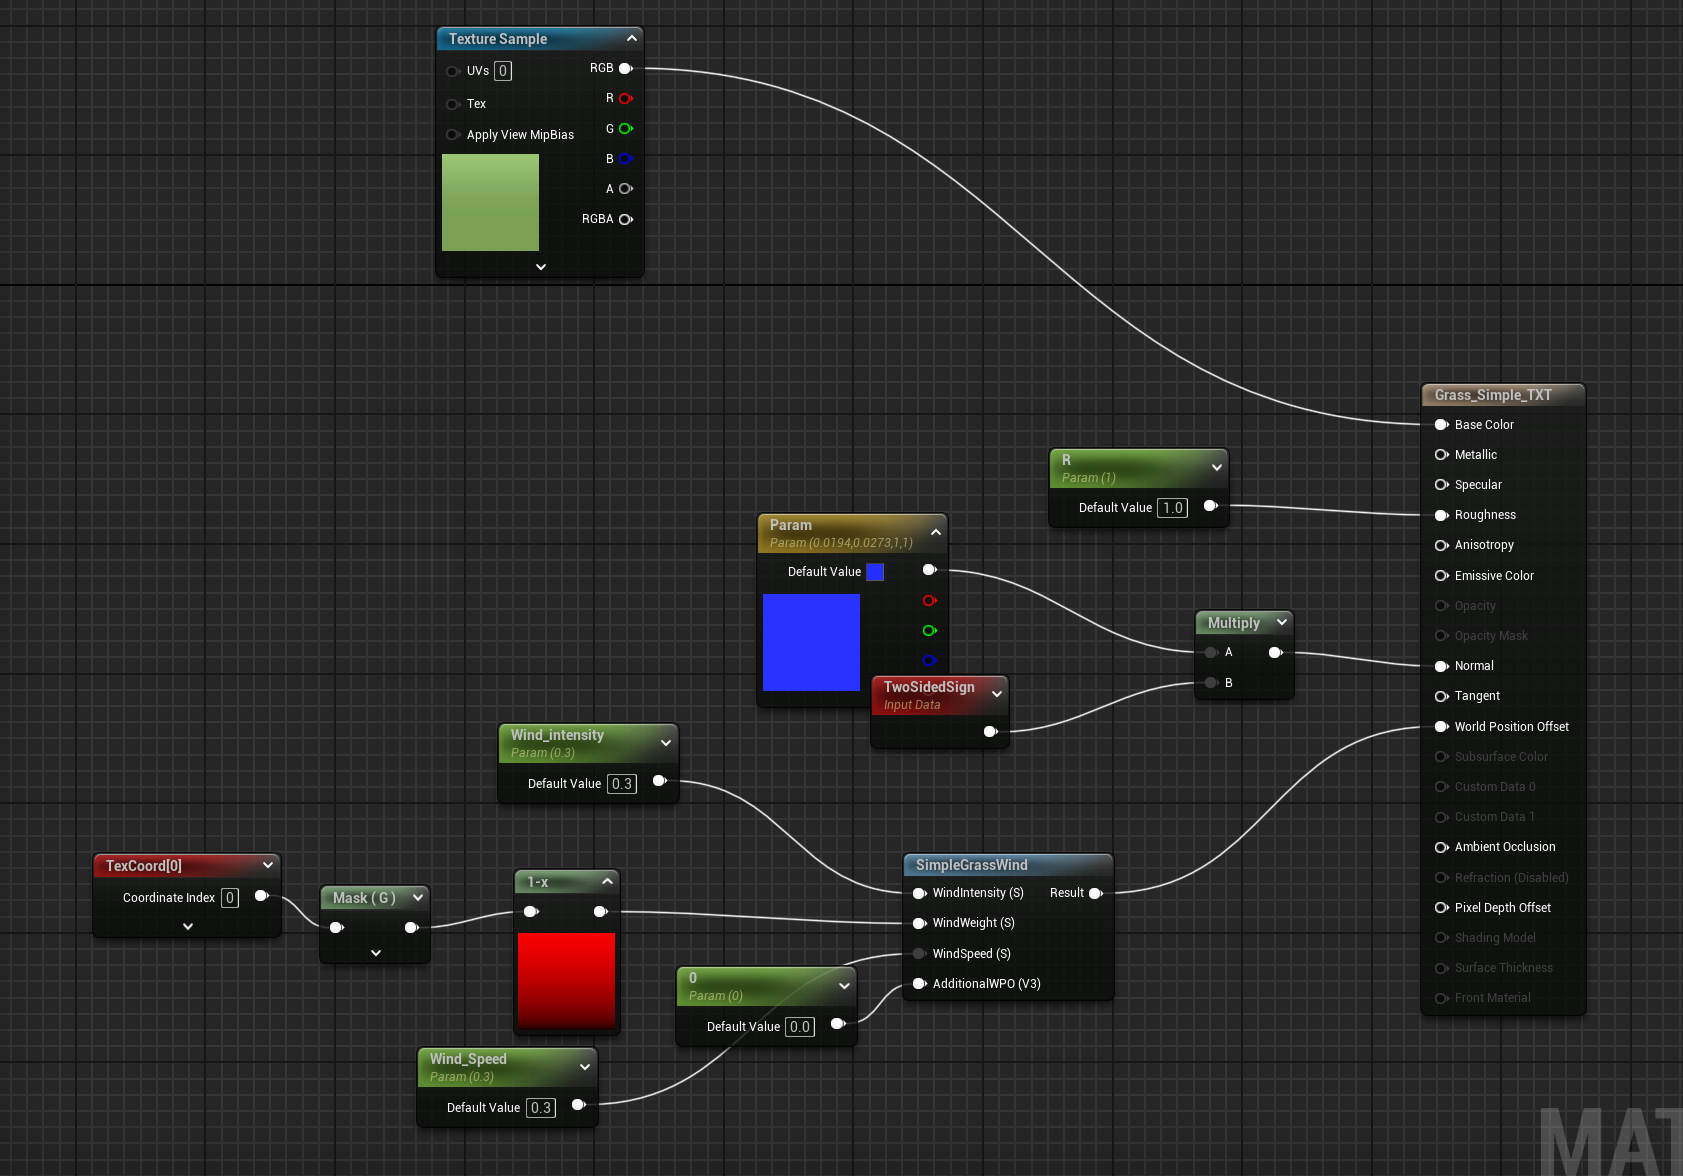
Stylized Grass Shader in Unreal Engine
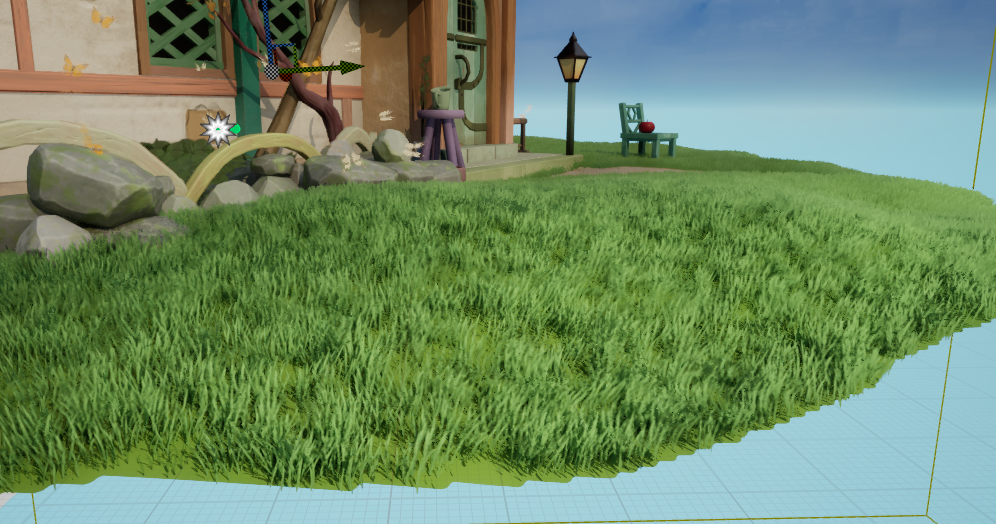
Grass in Scene
Texturing
Once I started texturing the house, it began coming together very quickly. Since I had already created my wood trim sheet, a large portion of the house was already textured automatically.
The two main textures that I thought would be the most time-consuming and need multiple iterations were the roof of the house and the brick/plaster walls. For both of these materials, I ended up utilizing Substance Designer to some extent, and then adding final detailing within Substance Painter.
To create the slate-style pattern of the roof, the main tutorial I ended up using was the Slate Roof Tutorial by Fast Track Tutorials. I created the main pattern and colors through Designer and then added final detailing and enhancements in Painter. When bringing the textures into Painter, I used a 3D flat plane model to apply the textures instead of using a roof model. This way, my final texture export from Painter remained flat and tileable.
Similar to the wood trim sheet, I used this same roof texture for all my roof models by just applying the texture and then adjusting the UVs of the roof accordingly. I also made sure all roof model UVs had the same texel density so that the tiling amount matched across the entire house.
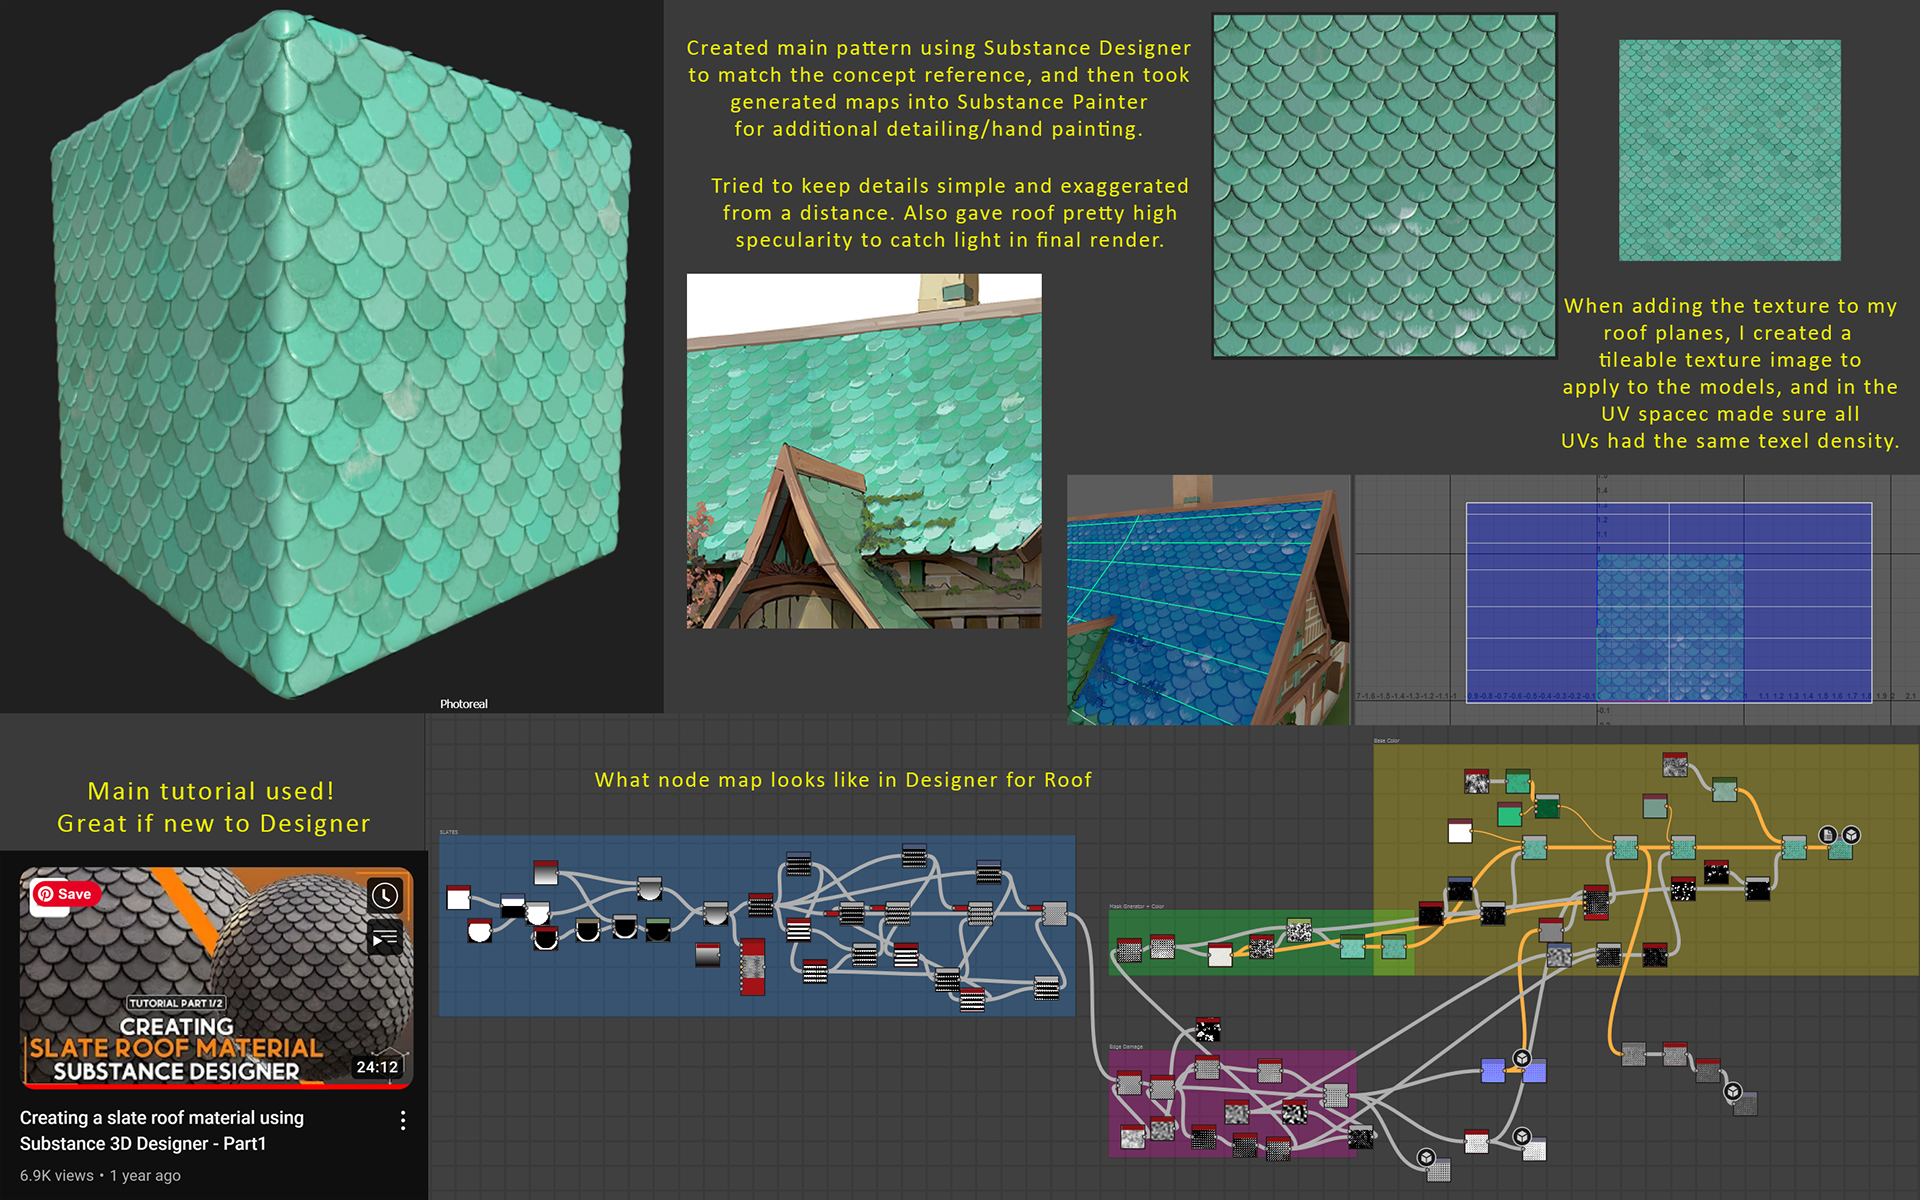
Creating a Stylized Tileable Slate Roof
The brick and plaster walls were a bit more of a challenge to figure out and took many iterations to refine. My first idea was to create a fully procedural material within Designer, similar to the roof, however, due to time constraints I ended up tackling the material in a slightly easier but notably less efficient way using both Painter and Designer.
I created the stylized plaster material fully in Designer, taking advice from creating brushstroke shapes using the documentation from Vincent Dérozier. Once this was made, with help from my mentor Nathan Ayres, I created a brick pattern in Designer that, if tiled, could somewhat match the reference of the concept art. For the brick pattern, I exported the normal maps of my bricks, as well as a blend of a flood fill and the pattern, to manipulate separate brick colors in Painter without hand painting each brick.
Within Substance Painter, I used a compare mask with the bricks and plaster, as well as height layers to give the impression that the plaster was both above and underneath the bricks. I also added layers of different color changes and grunges, to make more natural brick color variations. Each different wall plane had the original brick pattern scaled and stretched in a different way to best match the reference without me having to create an entirely new brick pattern for each wall plane.
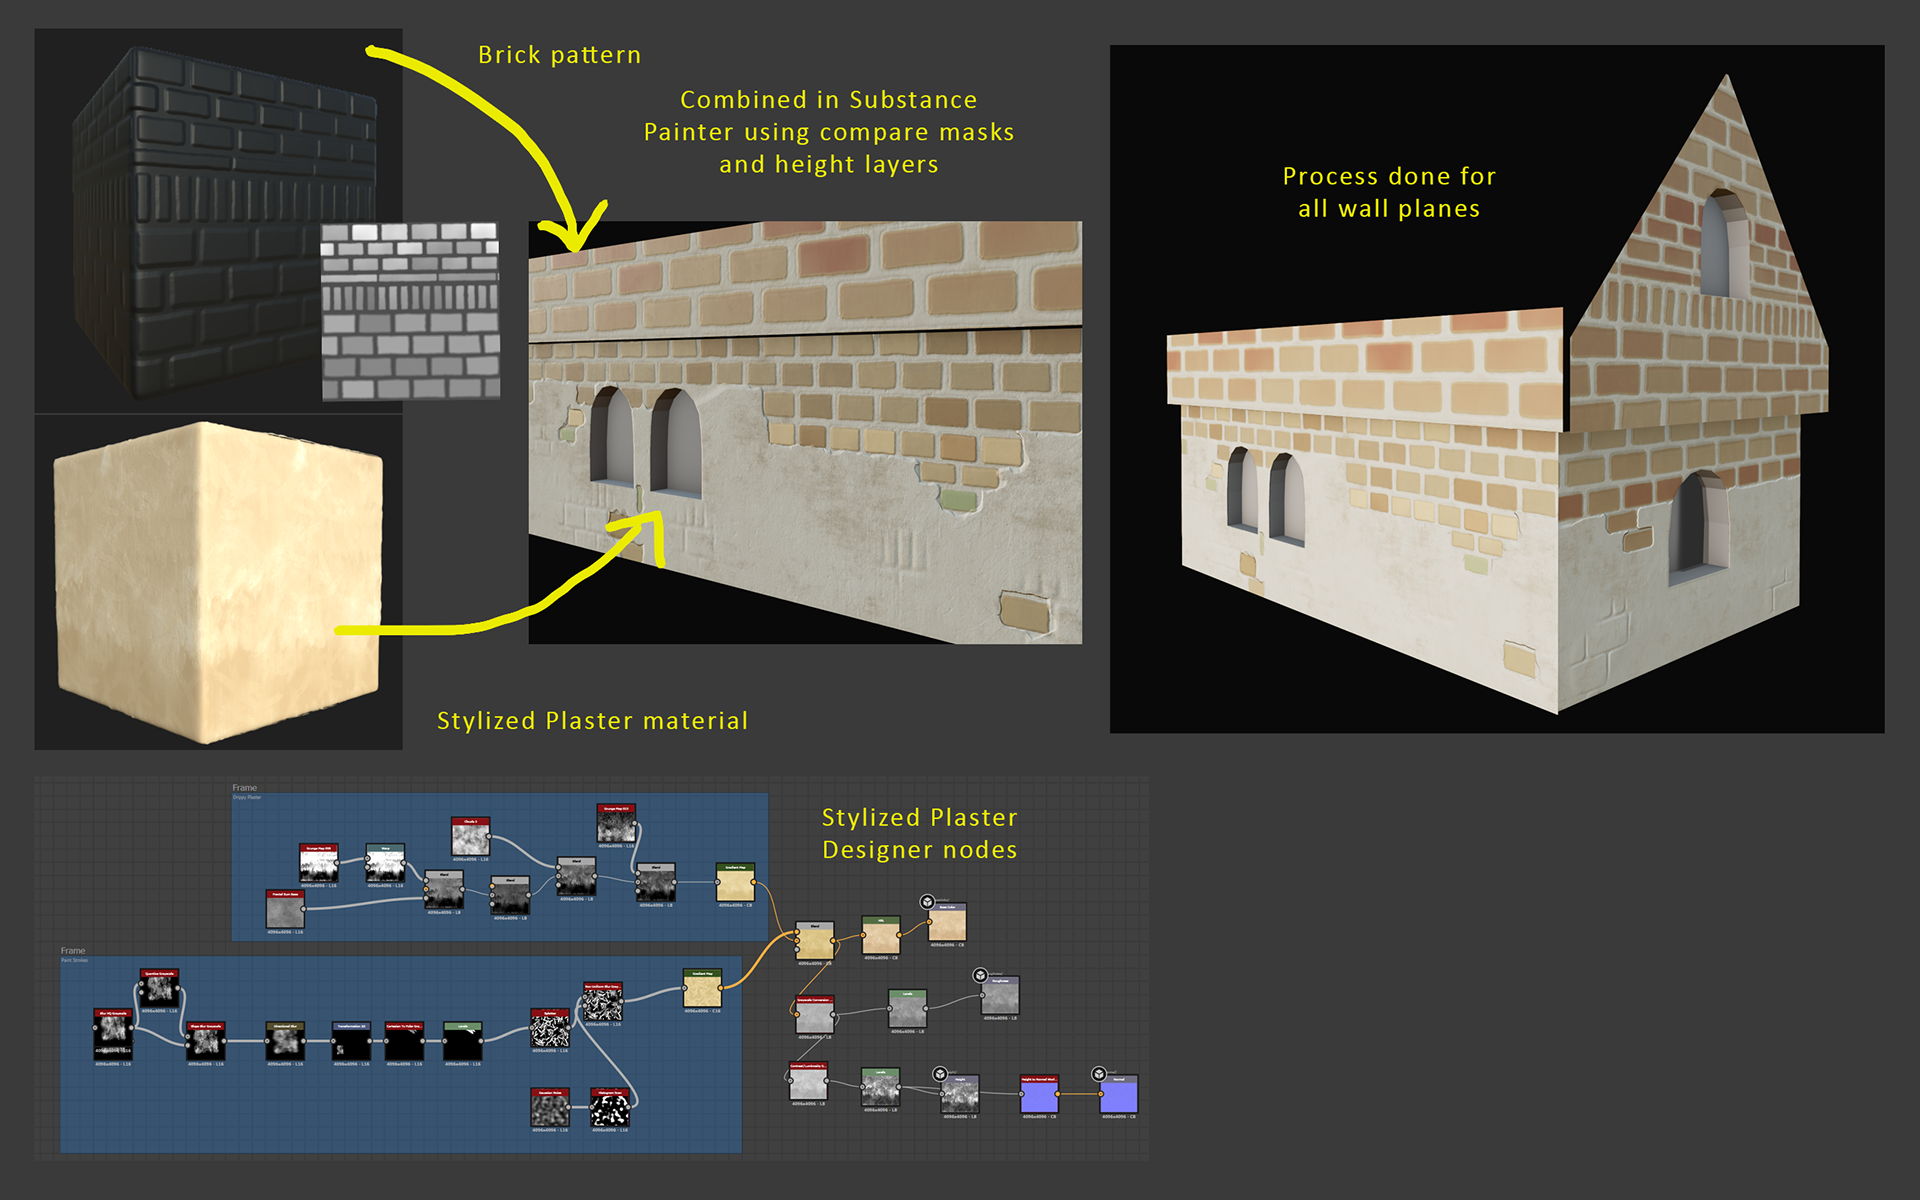
Creating a Stylized Plaster Brick Wall
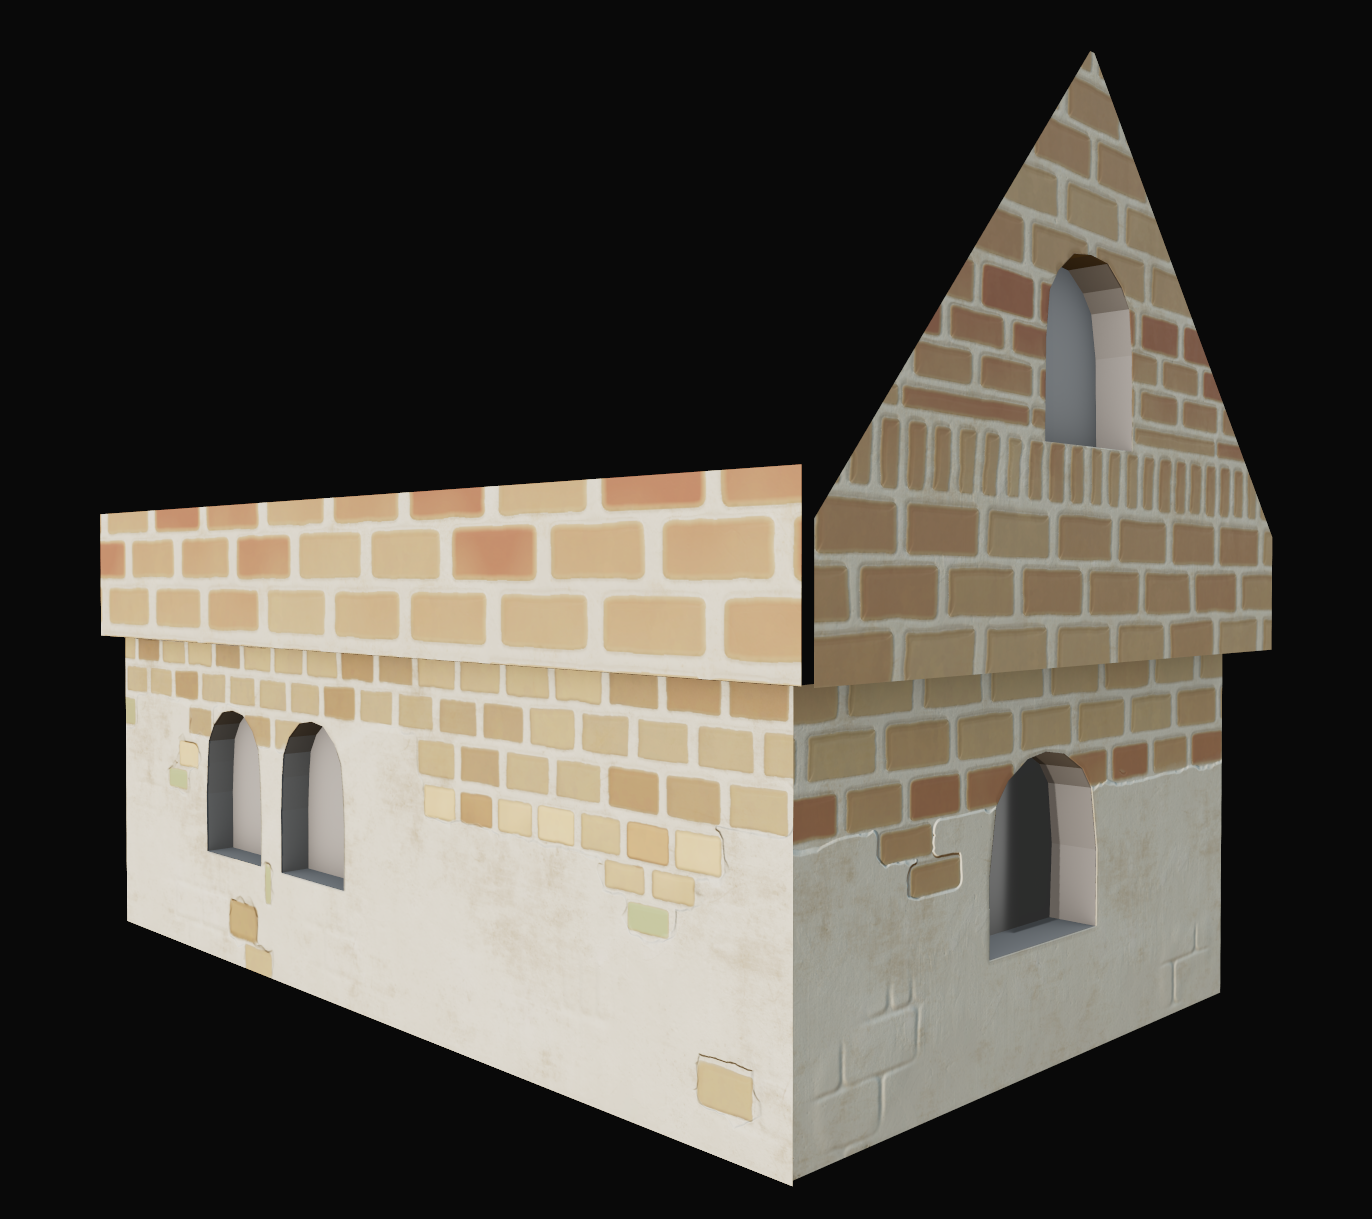
Example of Textured Walls in Substance Painter
Substance Painter Adjustment Timelapse
Circling back to the wood trim sheet that I had made earlier, once I began applying my wood to the assets in my scene, I realized I needed a lot more color variation in my wood planks. In Substance Painter, I created around 4 different colorways for the unpainted wood planks and 3 for the painted wood, but this still wasn't achieving the desired look.
I noticed that in the concept art for my house, certain wood planks had an almost gradient of color that transitioned into another, and I knew I wanted this kind of look as well. My solution to achieve this was through Vertex/Mesh painting. The main tutorial I utilized to figure out this workflow was the Advanced Material Blending tutorial by Cairo Goodbrand. Using this tutorial, I was able to figure out how to create a material node graph in Unreal that uses two different base colors and has much nicer and more stylized-looking wood columns and trims.
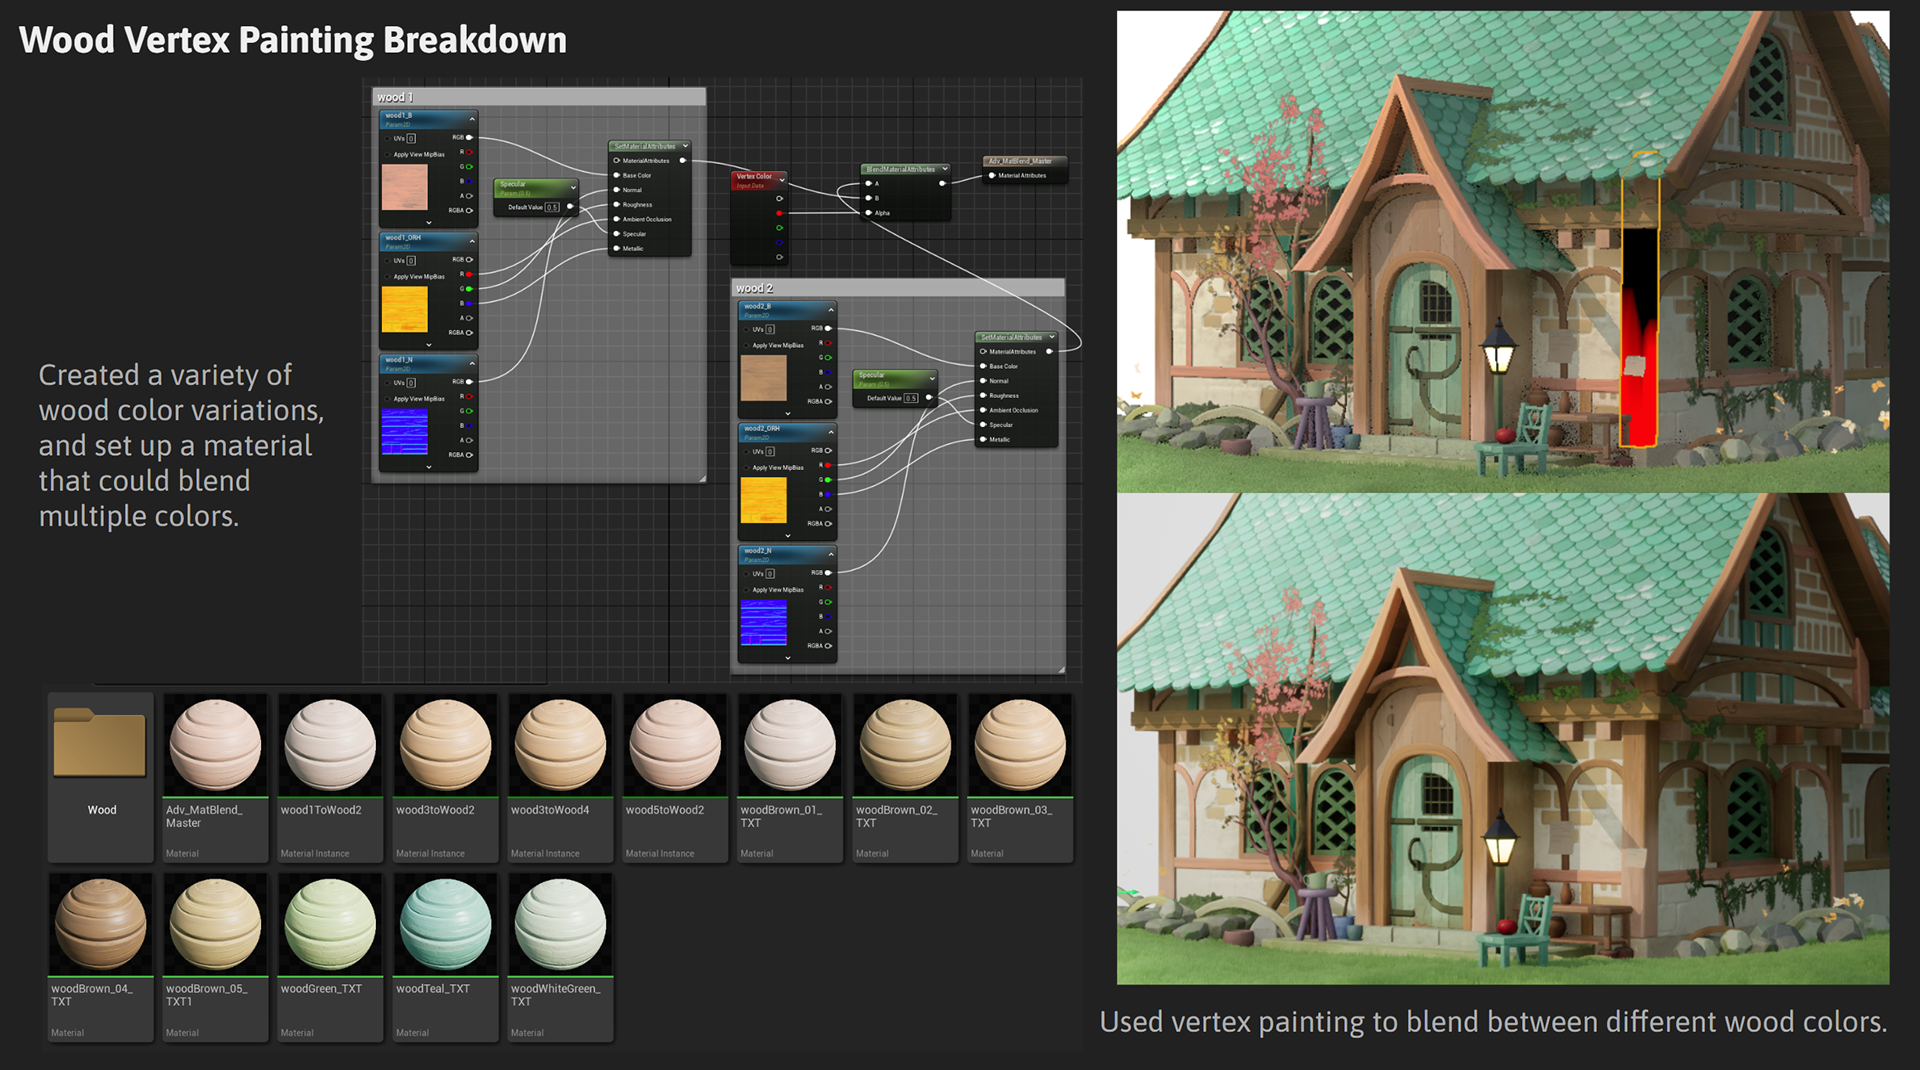
Mesh Painting Wood in Unreal
Once the walls, roof, and wood were textured, all other assets in the scene were textured individually and fairly quickly, albeit with multiple passes. I've included some screenshots of multiple texture passes that I went through with my house, attempting to get my final product closer and closer to the concept art.
Adjusting my lighting and adjusting my textures went hand in hand for this scene to get the exact look I wanted, so throughout this project, I would constantly change lights, then change the textures, and so on.
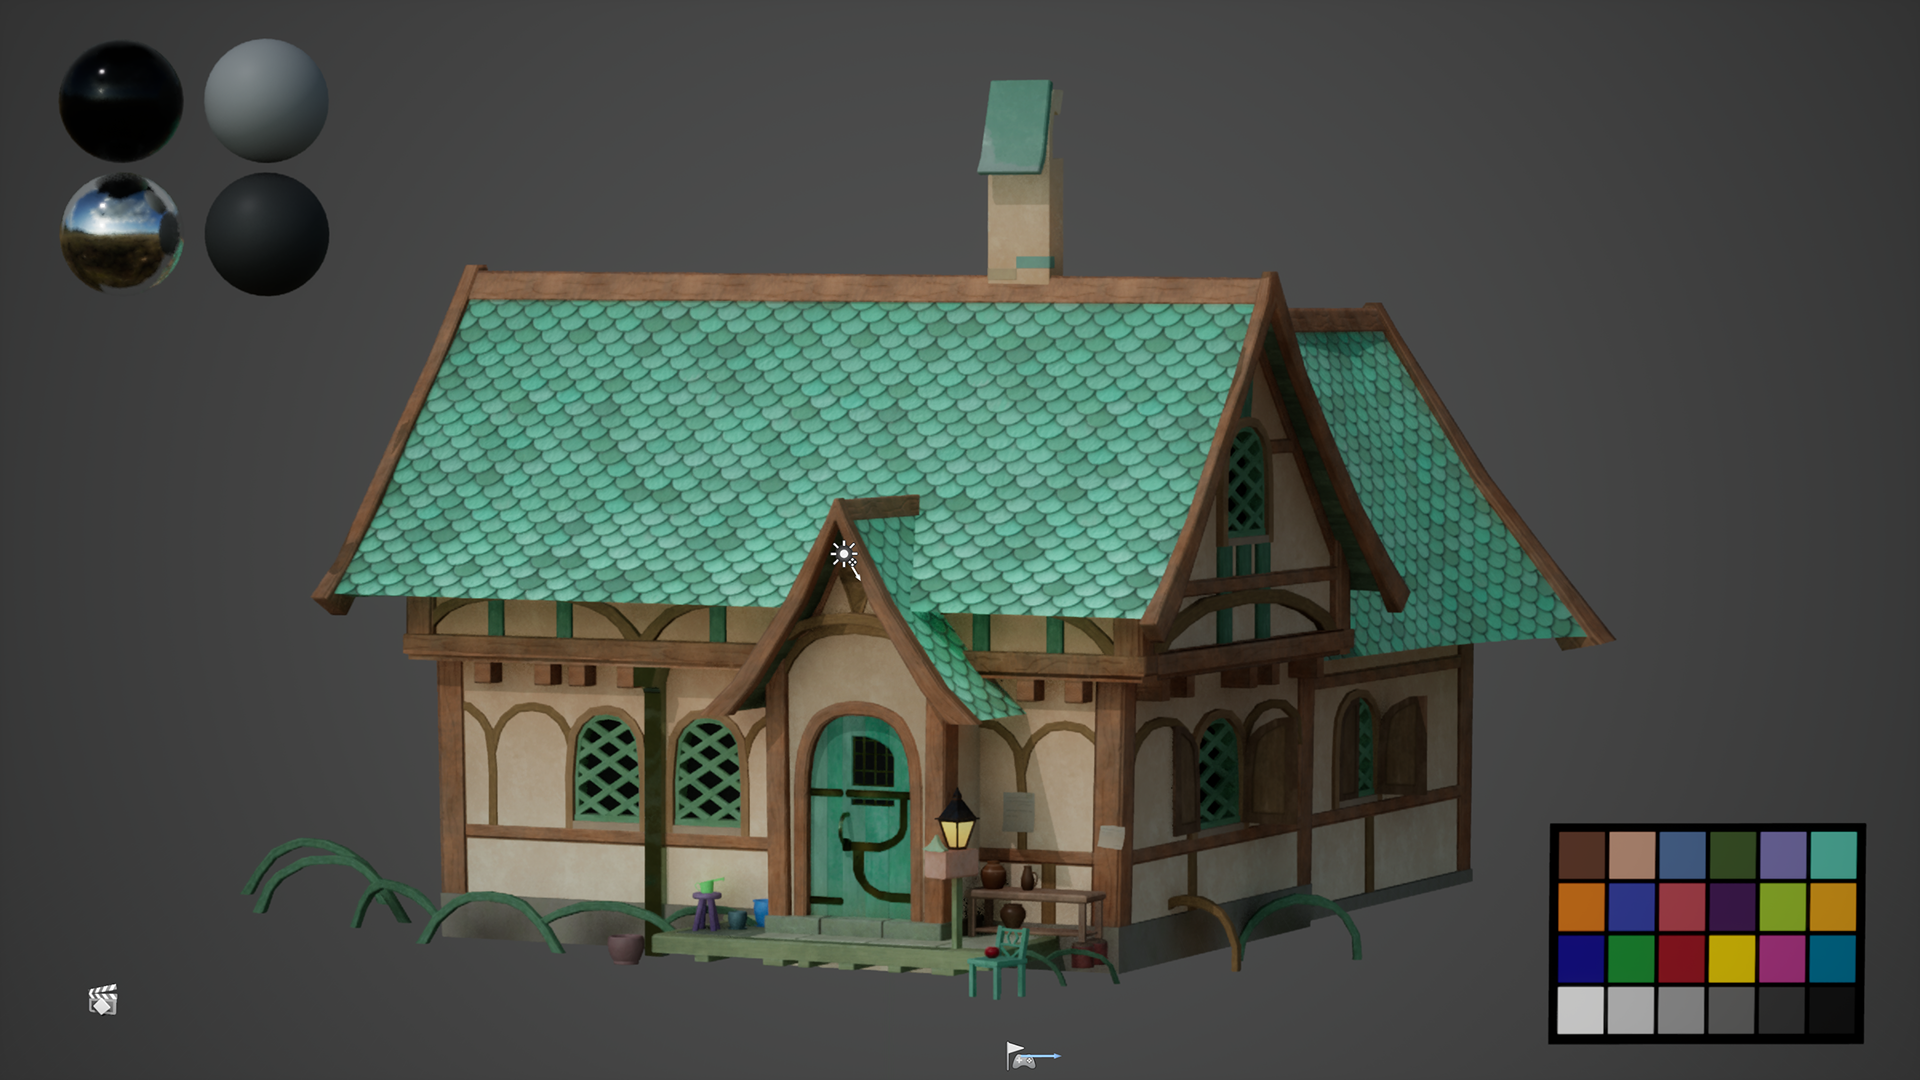
Texture Pass 1
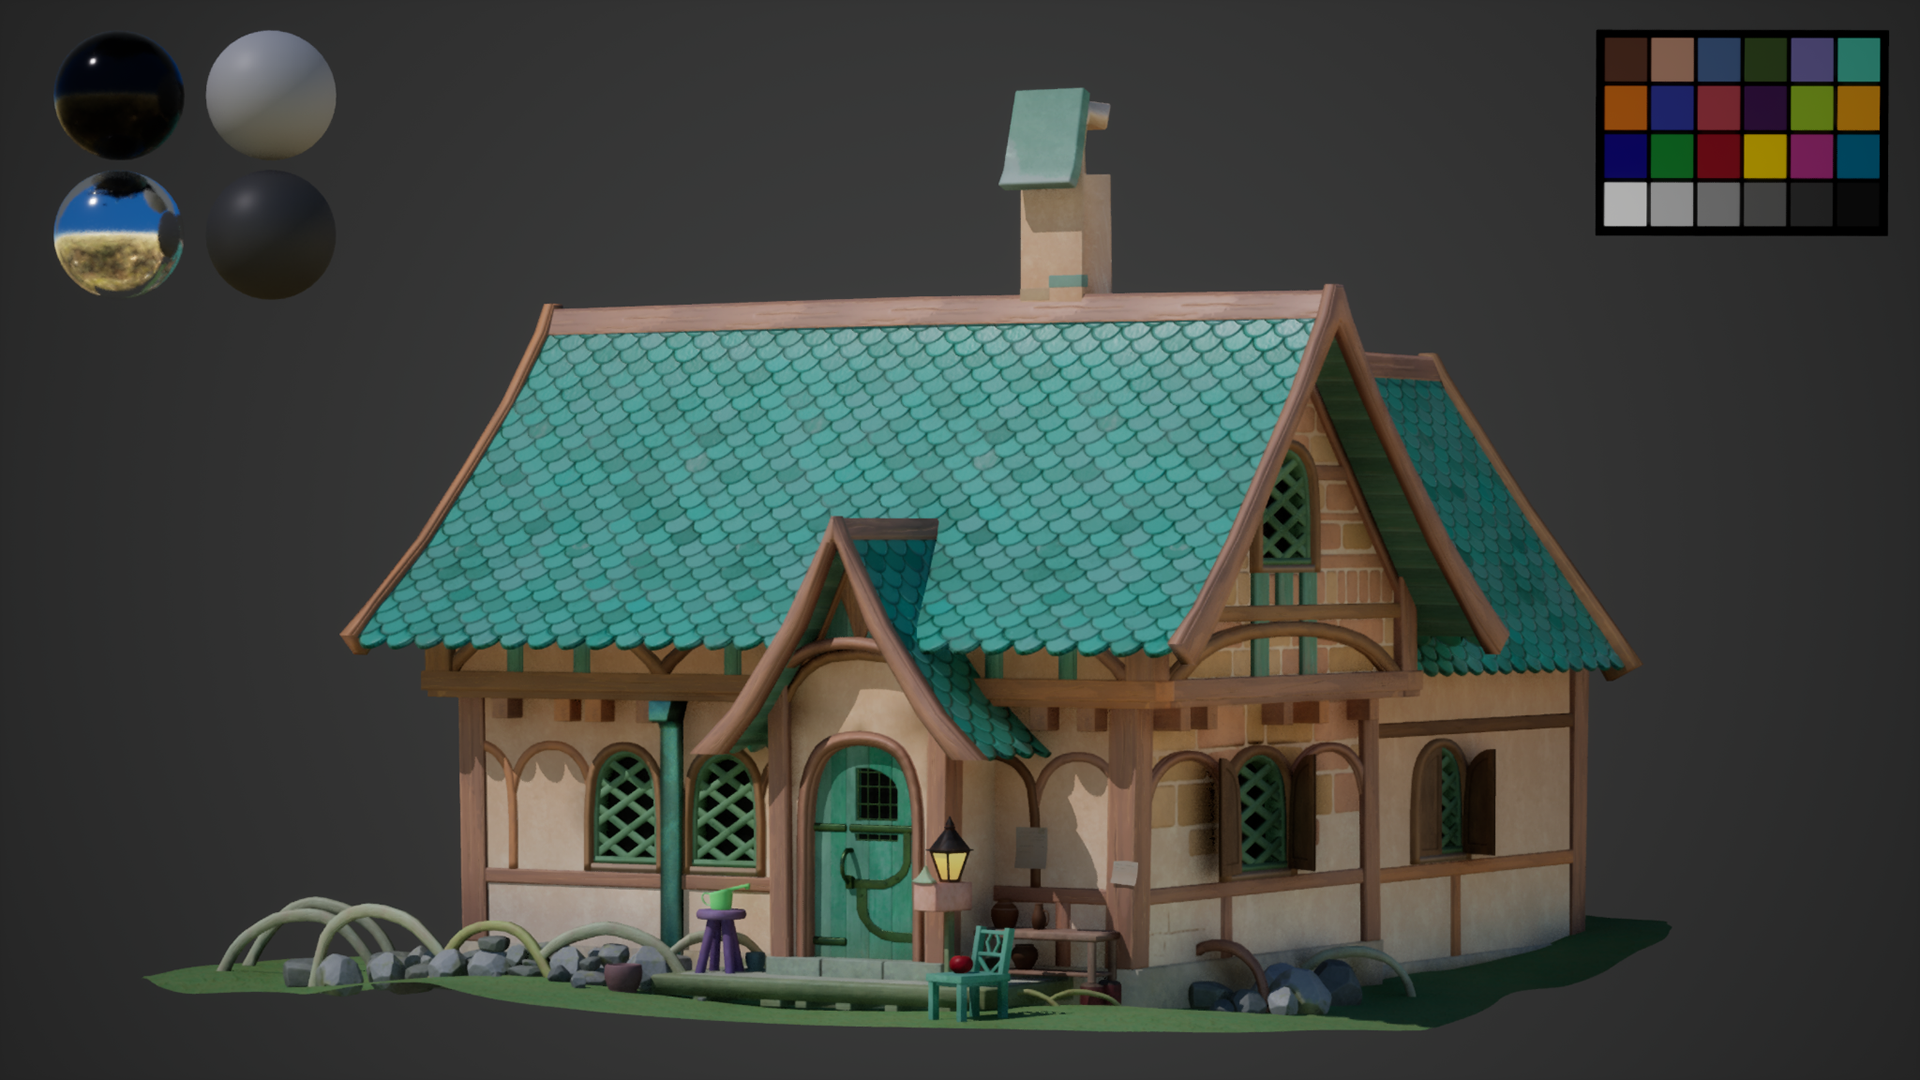
Texture Pass 2
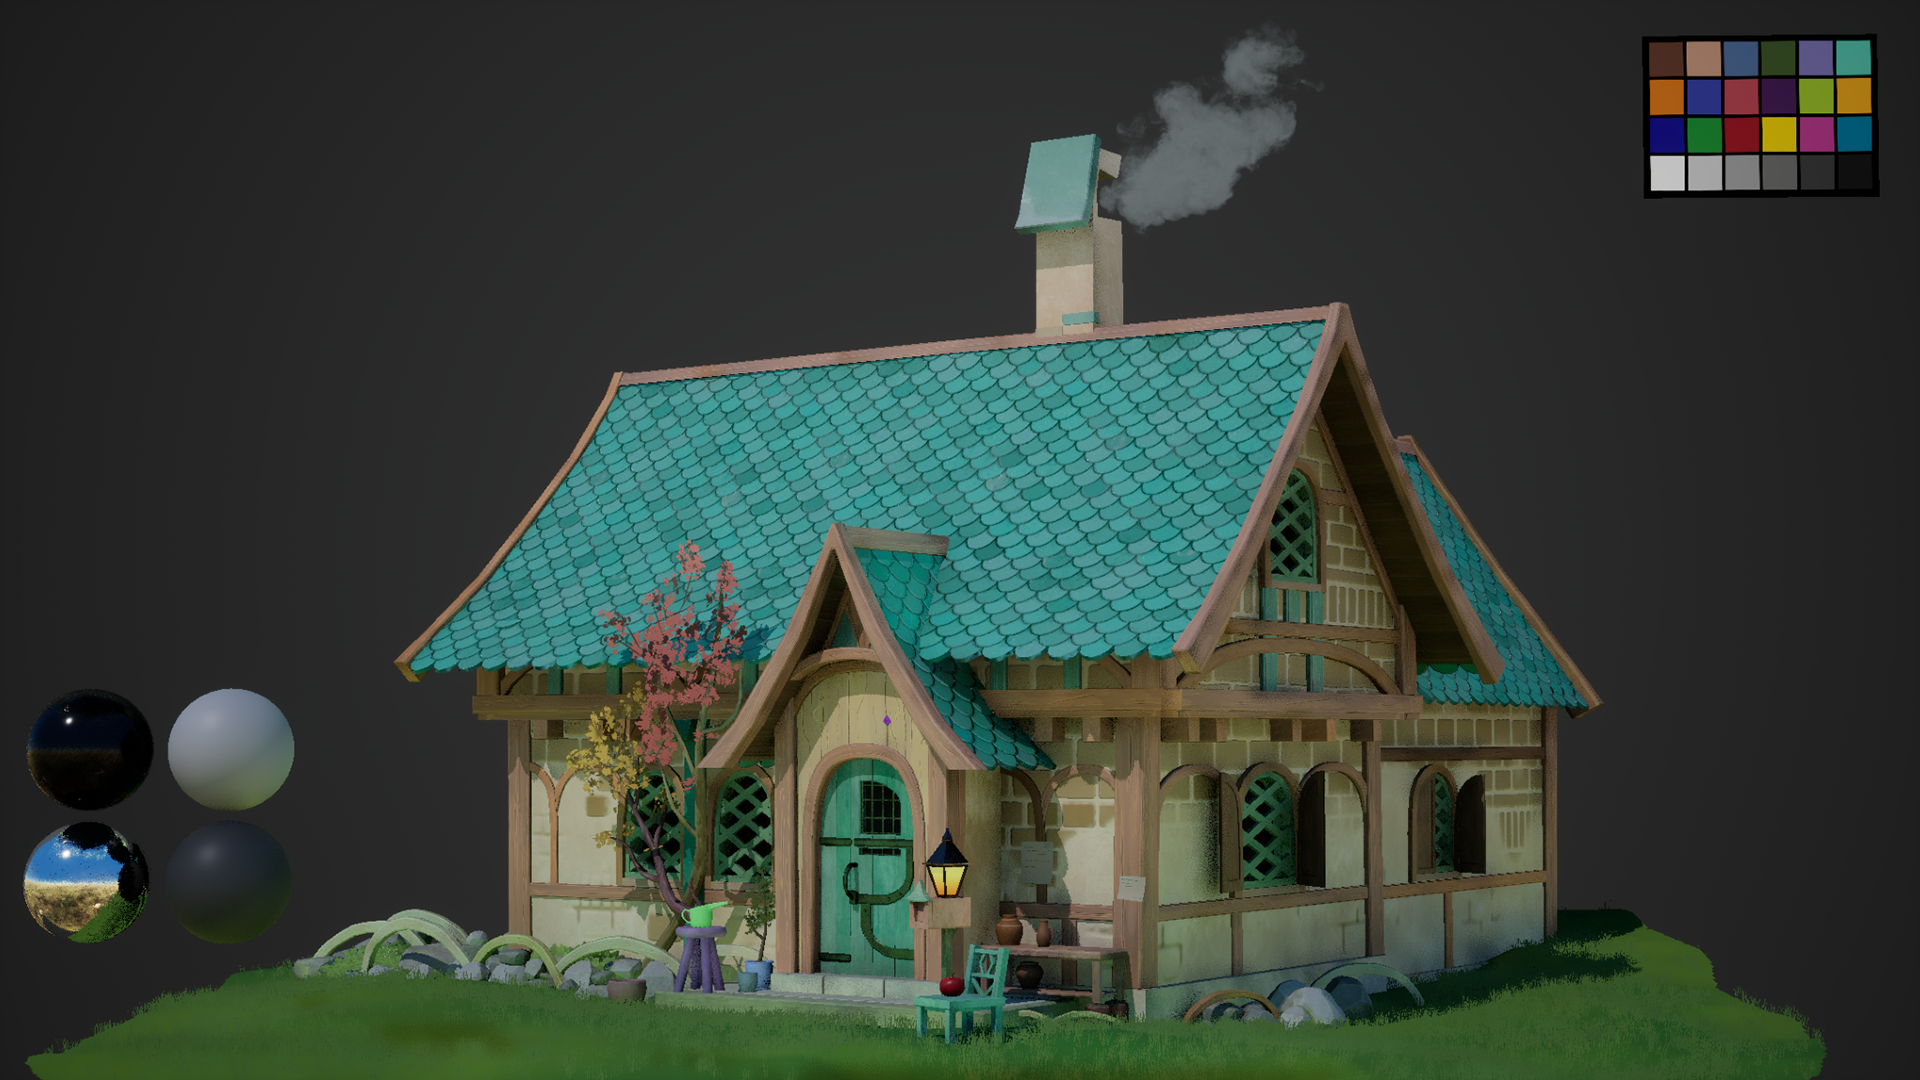
Texture Pass 3
Texture Pass 4
Lighting
The hardest part about setting up the lights was angling them to create interesting and dynamic shadows that matched the original concept art. The lighting setup I ended up using included a directional light, a sky HDRI, and a couple of rectangle lights placed at certain angles of the roof for the roof tiles to catch a bit more specular hits and appear less flat. For my sky HDRI, I found a free HDRI on Polyhaven that had a green meadow and a blue sky, which matched my implied scene surrounding the house.
I tried playing with the idea of lights coming from inside the house using emissions but ended up going with just keeping the inside of the house dark so it wasn't too distracting. However, I did utilize emissive textures with the light by the front door, giving the emissive light properties so that it produced light within the scene.
Final Results
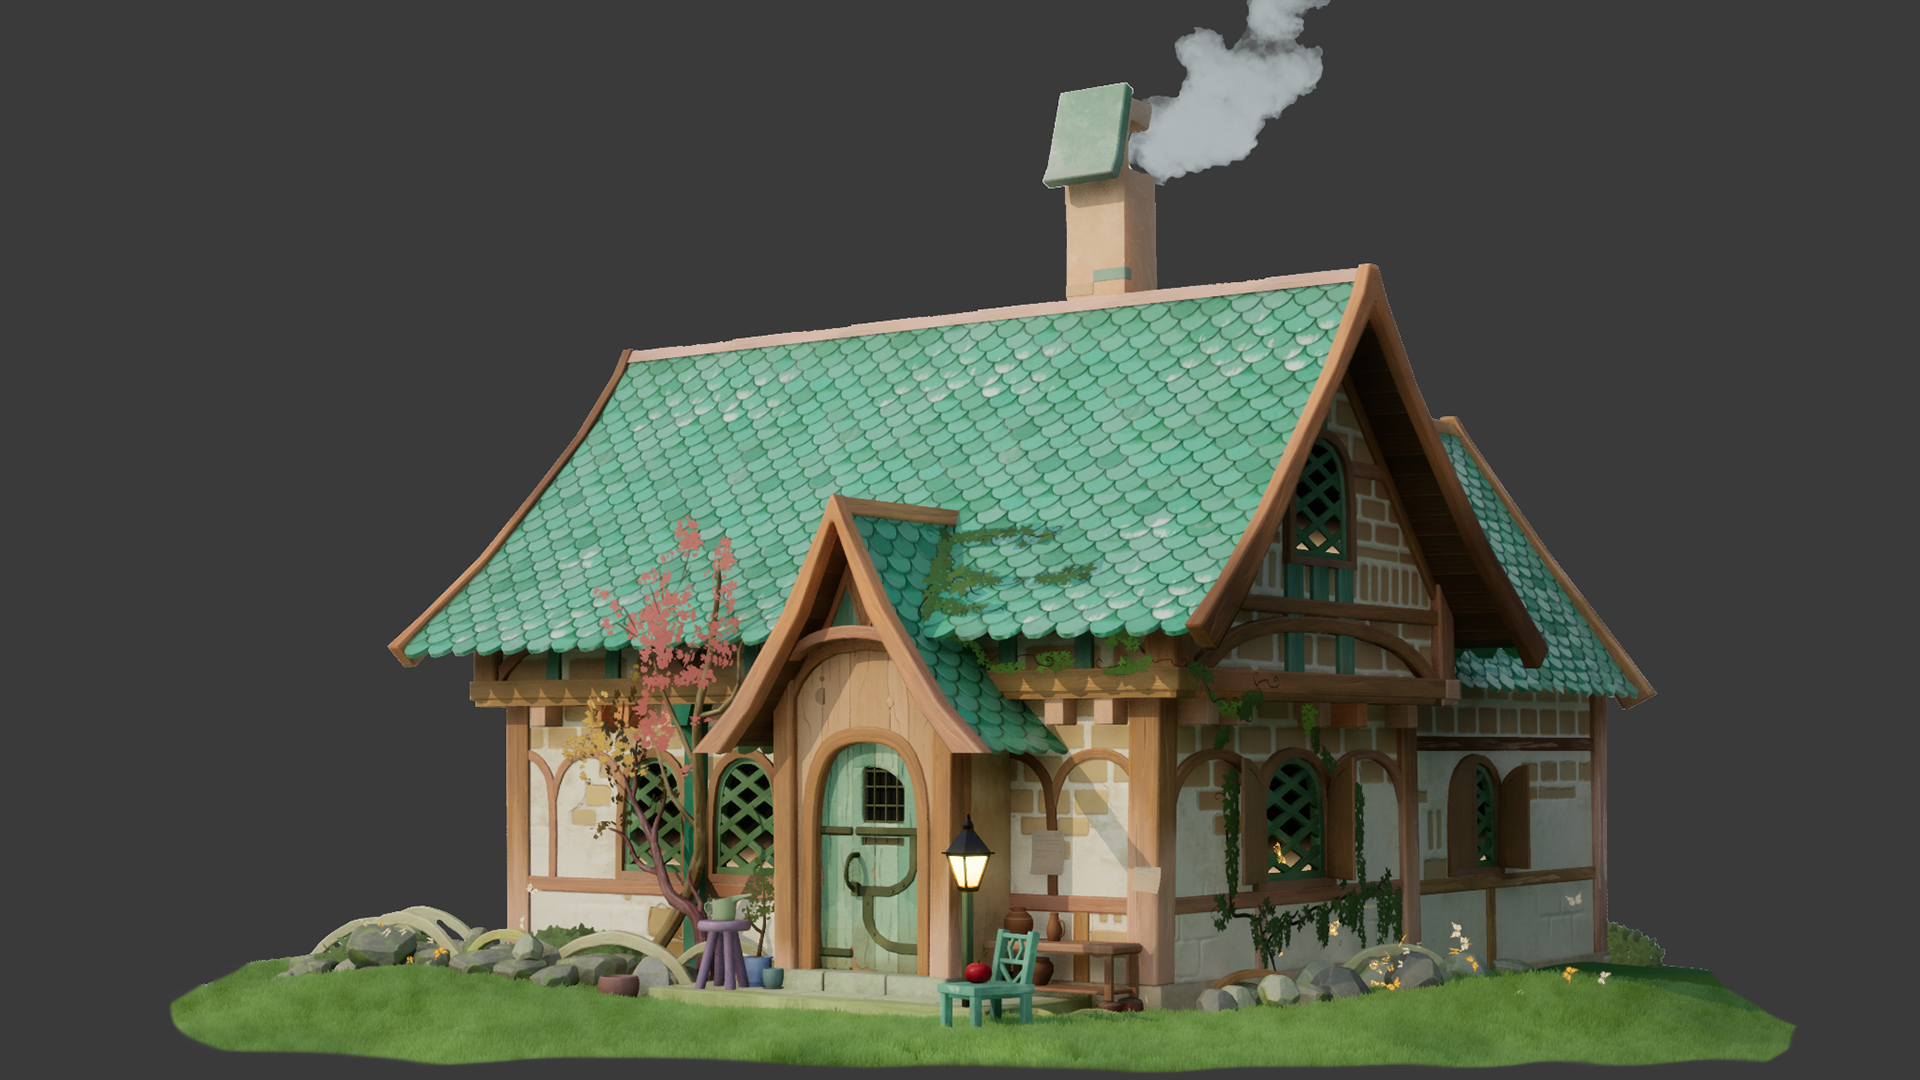
At the end of my project, here are my final deliverables! For the final renders, I created a post-processing material that adds graphic line work to the outside of the house using the tutorial by Nils Gallist. I also created a partially painted sky for the back of the house to make the background more interesting.
For the moving effects, I used the default Unreal Engine smoke emitter for the chimney, as well as free Unreal Marketplace butterflies to put around the grass. I also animated the emissive light within the light post by the front door, so that it seemed more real.
I rendered out a turntable of my house model to showcase the fully modeled building, plus two camera renders: a slow zoom and a slight rotation around the house to show dimensionality.
Stylized Cottage, Model Turntable
Stylized Cottage, Still Camera
Stylized Cottage, Rotating Camera
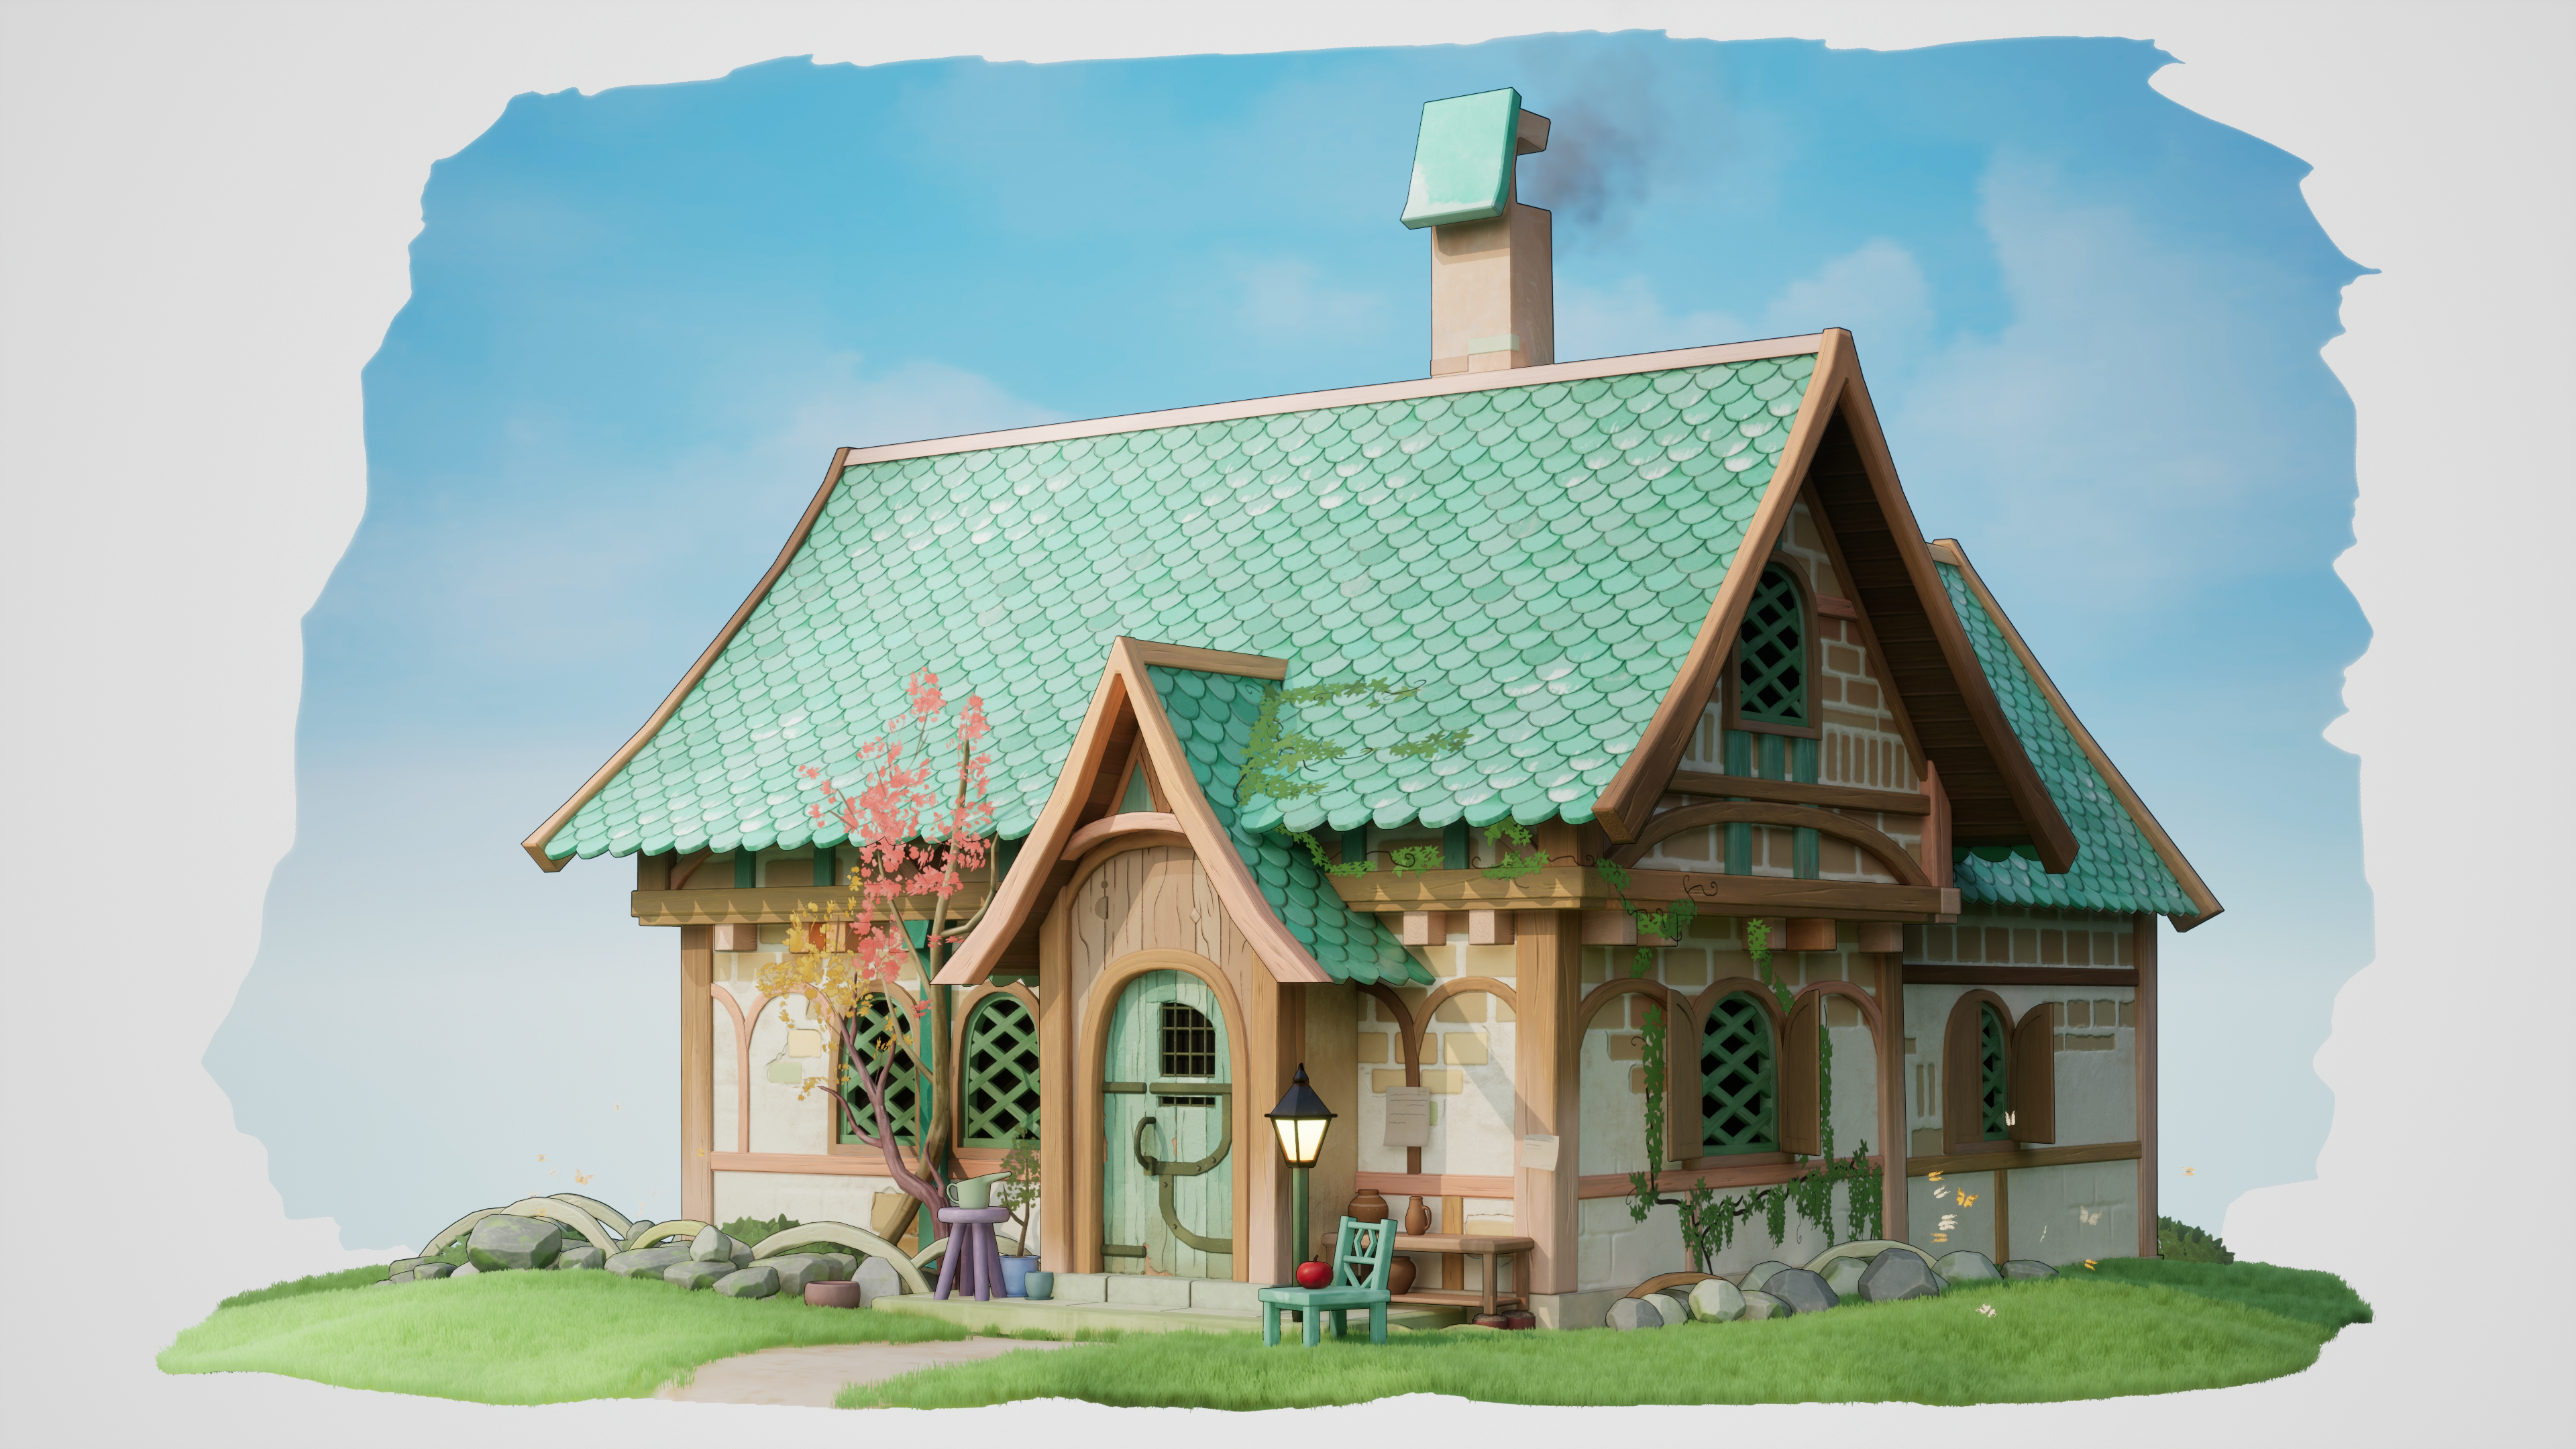
Stylized Cottage, Final Visual Render
Project Reflection
With this project, I expected to create a game-ready asset and to learn the video game asset pipeline for Unreal Engine.
I did end up meeting these expectations that I originally set, but in the future I would hope to further improve and expand upon the environment that the house exists in, further adjust and improve the materials of the house that I spent less time on, as well as learn more about foliage generation and Unreal FX systems.
Special Thanks
Very special thanks to my mentor Nathan Ayres of Turbo Button!
Also thank you to my professor Caleb Kicklighter, Kathryn King, and my peers.
I could not have done this project without the mentorship and guidance of those listed above, and am very grateful!